
In this guide I’ll walk you through creating schedules that control when your virtual machines automatically start and stop. Scheduling is one of the easiest ways to reduce cloud costs, enforce maintenance windows and make sure services are available only when required. Below you’ll find a clear, step‑by‑step walkthrough of the scheduling UI, practical tips, examples, and a FAQ to help you put schedules into production with confidence.
Why use schedules for virtual machines?
Schedules let you define times across each day of the week when the VMs that the schedule applies to should be either powered on and available, or stopped and deallocated/parked. That means you can:
- Save costs by powering down development and test VMs outside business hours.
- Enforce consistent availability windows for applications.
- Automate environment state changes without manual intervention or scripts.
In short, schedules give administrators a reliable, centralised way to manage VM uptime across an estate of machines.

Overview: the steps you’ll follow
- Log in to Cloud Toggle and open the Schedules page.
- Create a new schedule by adding a name and description.
- Select the VMs the schedule should affect.
- Choose the schedule time zone.
- Pick the schedule type and, if using a custom schedule, set the resolution and active blocks.
- Save the schedule and verify it applies correctly.
Step-by-step: creating a schedule
1. Log in and navigate to Schedules
Begin by logging into your Cloud Toggle account. Once you are on your dashboard, head to the top-left corner and open the drop-down menu. Select Schedules to view existing schedules or create a new one.
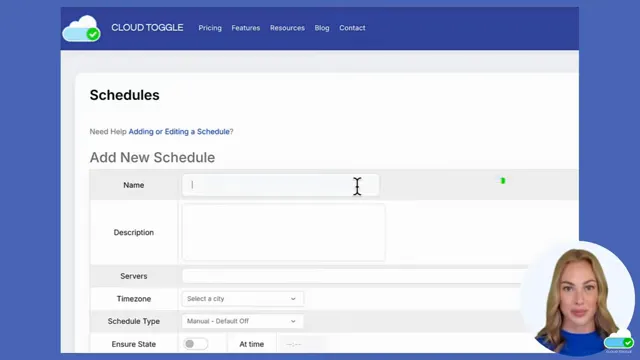
2. Add a new schedule
Click Add schedule. The create form prompts you for the following key pieces of information:
- Schedule name — Use a clear, standardised naming convention (for example, “Dev-VM-Weekday-9to5” or “Prod-Backup-Maintenance”).
- Description — Briefly explain what the schedule does and which VMs it targets. This helps other admins understand intent later.
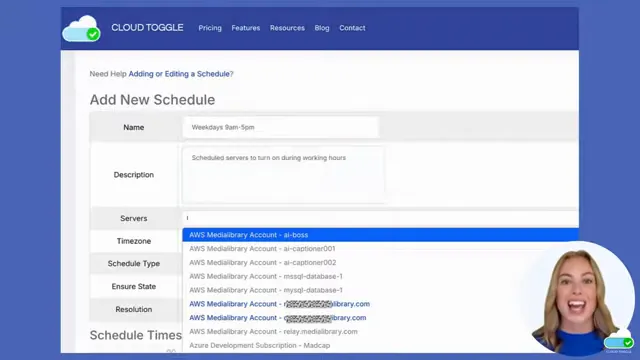
- Servers — Click the servers drop-down and select all virtual machines that this schedule should affect. You can apply one schedule to many VMs if they share the same uptime requirements.
3. Choose the time zone
Schedules are timezone-aware. Select the time zone that the schedule should adhere to. This is especially important for teams that manage VMs across multiple regions or when daylight saving changes occur.
4. Pick a schedule type
The Schedule type determines how VMs behave in relation to the schedule:
- Manual — The UI treats manual as a default, meaning the VMs remain off unless manually turned on (manual default off) or remain on unless manually turned off (manual default on) depending on the chosen default.
- Default off — Keeps VMs off unless someone explicitly turns them on.
- Default on — Keeps VMs on unless they are explicitly turned off by the schedule.
- Ensure state — Will reset all VMs to their scheduled state at a specified time each day. This is useful to enforce a known state after manual changes.
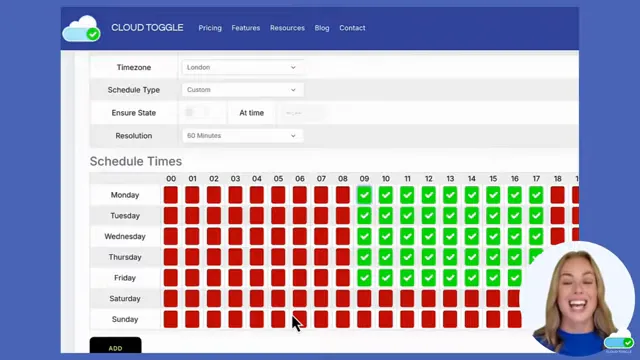
- Custom — Allows you to define specific times on a grid-style schedule below the form. Use this when you need fine-grained control across the week.
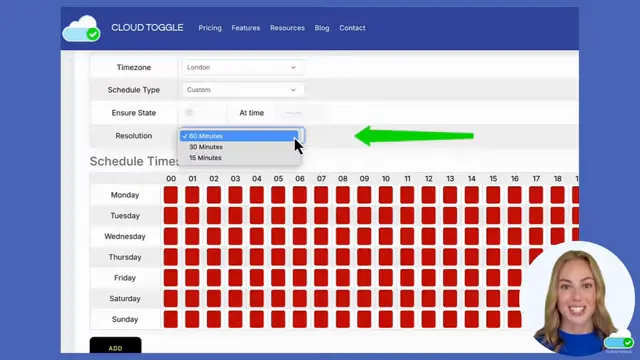
5. Set the resolution and custom blocks (if applicable)
If you choose the Custom schedule type, the next setting is the resolution. Resolution controls the granularity of your schedule blocks:
- 60 minutes — Schedule in one-hour blocks. Best for standard business-hour schedules.
- 30 minutes — Half-hour increments for more precise control.
- 15 minutes — Quarter-hour increments for the finest control.
After selecting the resolution, define the active blocks on the weekly grid. For example, if you want a server on between 9:00 a.m. and 5:00 p.m. on weekdays, set one‑hour blocks from 09:00 to 17:00 Monday through Friday.
6. Save and apply
When you’re happy with the selections, click Add at the bottom of the page to create your schedule. Once added, the schedule will apply to the VMs you selected and take effect according to the chosen time zone and schedule type.
Practical example: setting 9:00–17:00 weekdays
Here’s a concrete example you can replicate quickly:
- Set schedule name: Office-Hours-9-5.
- Description: Enable dev environment during UK business hours.
- Select development VMs in Servers.
- Choose time zone: Europe/London (or your local zone).
- Schedule type: Custom.
- Resolution: 60 minutes.
- On the weekly grid, enable blocks from 09:00 to 17:00, Monday to Friday.
- Click Add to save and apply.
The VMs will now be powered on during business hours and stopped outside of those hours, automatically.
Troubleshooting common issues
If a VM doesn’t follow a schedule, check the following:
- Is the VM included in the Servers list for the schedule?
- Does another schedule with higher priority also target the same VM?
- Was the schedule created in the correct time zone?
- Is there an ongoing manual override or maintenance task that changed the VM state after the schedule ran?
- Check the activity logs to confirm schedule execution times and errors.
Security and governance considerations
Scheduling impacts availability—ensure your change control and access policies account for it. Limit who can create or modify schedules, and document schedule intent in your operational runbooks so on-call engineers understand the expected states during incident triage.
Cost and operational benefits
Consistently applied schedules quickly translate to cost savings, especially for non-production environments. When combined with rightsizing and power-aware orchestration, schedules are a high-impact, low-effort optimisation.

FAQ
Q: Can I apply one schedule to multiple VMs?
A: Yes. Select multiple VMs in the Servers drop-down when creating the schedule. The same on/off behaviour will apply to all selected machines.
Q: Can I make hourly schedules or very fine-grained windows?
A: Yes. Choose the resolution at 60, 30, or 15 minutes depending on the control required. Fifteen-minute resolution lets you create small maintenance or availability windows.
Q: How do I revert a schedule or temporarily disable it?
A: Use the Schedules page to disable or delete a schedule. For temporary changes, consider disabling the schedule rather than deleting it so you can re-enable later without recreating the configuration.
Final thoughts
Scheduling in CLOUD TOGGLE is a straightforward but powerful tool. With a few clicks you can align VM availability to business needs, significantly reduce costs and enforce standard operational behaviour. Start by creating a small test schedule, validate it, then roll out to larger sets of machines. If you need more advanced orchestration, pairing schedules with automation tools and monitoring will provide a robust, low-maintenance environment.
For more information, documentation and examples, visit our website at www.cloudtoggle.com.
Want to Learn More? |
|
|
| Book a Meeting |