If your AWS bill feels like it's spiraling out of control, you're not alone. Many organizations watch their cloud spending climb month after month without a clear plan to stop it. The good news is that a few targeted actions can make a massive difference, putting you back in the driver's seat.
This guide is your playbook for tackling cloud waste head-on, starting with the changes that deliver the biggest and fastest returns.
Your Starting Point for AWS Cost Reduction
To really make a dent in your AWS costs, you have to go after the two biggest sources of waste: idle resources and overprovisioned instances. The single most impactful thing you can do is automate shutting down non-production servers during off-hours and correctly size your compute resources. This approach delivers immediate, significant savings.
The journey to lower costs always starts with understanding where your money is actually going. For most businesses, compute services like EC2 (Elastic Compute Cloud) eat up the largest slice of the budget. The problem often comes from old habits carried over from on-premises data centers, where servers were bought for peak capacity and left running 24/7.
The Hidden Costs of Overprovisioning
Overprovisioning is a massive, silent cost killer in the cloud. When teams migrate to AWS without changing their mindset, they bring those wasteful habits with them. It’s a well-documented issue; research shows that more than 80% of on-premises workloads are overprovisioned, with only 16% of OS instances correctly sized.
By simply right-sizing and powering down idle resources, companies can slash their total cost of ownership by up to 40%. You can dig deeper into how migration impacts TCO on the AWS enterprise strategy blog.
The core principle is simple: Don't pay for what you don't use. Shutting down a development server for just 12 hours a day and over the weekends cuts its monthly cost by over 70%.
This playbook is built around two primary goals:
- Scheduling Idle Resources: Automatically stopping non-production instances (like development, staging, and QA) during nights and weekends.
- Rightsizing Instances: Making sure your virtual machines are matched perfectly to their actual performance needs, not just guesswork.
By mastering these two areas, you're tackling the root causes of unnecessary spending. The rest of this guide will walk you through exactly how to implement these strategies, moving you from reactive bill-paying to proactive cost management.
Before we dive into the step-by-step details, let's get a high-level view of where you can get the biggest wins. The table below summarizes the most effective strategies, giving you a sense of the potential savings versus the effort needed to get them done.
Top AWS Cost Reduction Strategies at a Glance
| Strategy | Potential Savings | Implementation Effort |
|---|---|---|
| Schedule Idle Resources | 50-75% on non-prod servers | Low to Medium |
| Rightsize Instances | 20-40% on compute costs | Medium |
| Leverage Spot Instances | 50-90% on stateless workloads | Medium to High |
| Use Reserved Instances/Savings Plans | 30-72% on predictable workloads | Low to Medium |
| Implement Autoscaling | 15-30% on variable workloads | Medium |
| Clean Up Unused Resources | 5-15% of total bill | Low |
As you can see, scheduling and rightsizing offer a powerful combination of high savings potential with manageable effort, which is why we're starting there. They provide the quick wins that build momentum for a broader FinOps culture.
Finding and Measuring Waste in Your AWS Account
You can't slash your AWS bill if you don't know where the money is actually going. Before you can even think about optimizing, you have to find and measure the waste that's almost certainly hiding in your environment. Honestly, this initial audit is the most important part of getting your cloud spend under control.

The good news? AWS gives you some native tools to get started right away. Think of AWS Cost Explorer as your high-level financial dashboard and AWS Trusted Advisor as your personal, automated consultant. Together, they do a decent job of shining a light on the most common spots where your money is draining away.
Uncovering Hidden Waste with Native Tools
Your first mission is to hunt down "zombie" resources: assets that are running 24/7, racking up charges, but delivering zero value. You'd be surprised how common these are, especially in fast-paced dev environments where things get spun up and forgotten.
Trusted Advisor is particularly good at spotting these. Its cost optimization checks scan your account for the usual suspects:
- Idle EC2 Instances: These are virtual machines with rock-bottom CPU usage over a long period. They're begging to be either downsized or shut down completely.
- Unattached EBS Volumes: Think of these as storage disks that aren't connected to any running server. It’s like paying monthly rent for an empty storage unit.
- Idle Load Balancers: A load balancer with no instances registered behind it is just sitting there, costing you money every single hour.
While these tools are great for pointing you in the right direction, they just give you recommendations. The real work starts when you dig into the data, check with your teams to make sure a "low-use" server isn't a critical-but-quiet batch processor, and then finally take action.
For a much deeper dive, you'll want to get comfortable with your AWS Cost and Usage Reports. They provide a far more granular view, which is exactly what you need for a proper analysis. You can learn more about how they work in our guide explaining AWS Cost and Usage Reports.
The Power of a Consistent Tagging Strategy
Finding waste is one thing, but knowing which project, team, or environment it belongs to is another game entirely. This is where a solid tagging strategy becomes non-negotiable. Without it, your cost data is just one big, confusing number on a bill.
Tags are just simple key-value pairs you assign to your AWS resources, but with a consistent policy, they let you filter and group costs in Cost Explorer. Suddenly, you get crystal-clear visibility into who is spending what.
A strong tagging policy is the absolute foundation of cloud financial management. It turns your AWS bill from a mysterious operational expense into a strategic business metric you can actually manage and optimize.
If you don't have one, implement a mandatory tagging policy for all new resources today. A great starting point is to require these three essential tags:
- Project: The name of the project or application (
e.g., Project: New-Mobile-App). - Owner: The team or person responsible (
e.g., Owner: dev-team-alpha). - Environment: The deployment stage (
e.g., Environment: staging).
With just this simple structure, you can instantly see how much your staging environment costs or figure out which project is cranking up your EC2 bill. This kind of detail is crucial for making smart decisions. And while you're at it, ensuring efficient AWS S3 usage is another key piece of the puzzle, since storage is a core part of almost any AWS setup.
Rightsizing and Leveraging Modern Instance Types
Paying for oversized, underused resources is one of the easiest ways to blow up your AWS bill. It’s like paying for a moving truck every single day when all you really need is a sedan. This is where rightsizing comes in. It's the simple but critical process of matching your instance types and sizes to what your workloads actually need.
Overprovisioning is rarely intentional. It usually happens when an engineer launches a big instance "just in case" during a project's early days, and then nobody ever circles back to check on it. Over time, dozens of these "just in case" machines add up to a significant and totally avoidable expense. The goal here is to stop paying for capacity you just aren't using.
Using Data to Make Smart Rightsizing Decisions
Guesswork has no place in a proper rightsizing strategy. To do this right, you need data on how your instances are actually performing day-to-day. Luckily, AWS provides a powerful and free tool called AWS Compute Optimizer. It analyzes your resources' historical metrics and serves up data-backed recommendations.
This tool is smarter than just looking at average CPU usage. It digs deeper, analyzing things like:
- Memory Utilization: Is your application memory-hungry, or is it barely touching the RAM you've allocated?
- Network I/O: Does your instance handle heavy network traffic that might be better served by a different instance family?
- Disk I/O (EBS Throughput): Are your storage operations a bottleneck that a storage-optimized instance could easily solve?
By looking at this complete picture, Compute Optimizer can recommend specific instance types that are a much better fit for your workload's real profile. This often means suggesting a move to a smaller, cheaper instance or a different family entirely, all without hurting performance.
The Financial Upside of Modern Instances
Another key part of rightsizing is simply moving to newer instance generations. AWS is constantly innovating, releasing new hardware that offers better performance at a lower price. If you're still running on older instance types like the t2 or m4 families, you're leaving serious savings and efficiency gains on the table.
A perfect example is the shift to AWS Graviton processors. These custom ARM-based chips often deliver a far better price-performance ratio compared to their x86 counterparts for common workloads like application servers, microservices, and databases.
Migrating from an older generation instance to a newer one, especially a Graviton-based alternative, can often result in performance improvements of up to 40% at a 20% lower cost. This is one of the most direct ways to slash your AWS bill while simultaneously making your application faster.
Executing the Change with Confidence
Once you have solid recommendations from Compute Optimizer, the next step is to validate and implement them safely. You should never, ever apply rightsizing changes directly to a production environment without testing them first.
Here’s a practical, low-risk way to handle the switch:
- Start with Non-Critical Environments: Your dev, testing, or staging environments are the perfect sandboxes. You can validate the performance of a new instance type here without any risk to real users.
- Clone and Test: Create a clone of your application in staging. Apply the recommended instance change to that clone and run your standard performance and load tests against it.
- Monitor Key Metrics: Keep a close eye on the CPU, memory, and I/O metrics of the newly sized instance while it's under load. You need to confirm that it meets or exceeds the performance of the original.
- Plan for Production: Once you've validated everything, schedule a maintenance window for the production change. Use an approach that minimizes downtime, like a blue/green deployment or simply updating an Auto Scaling launch configuration.
This methodical process ensures your cost-saving efforts don't accidentally sabotage your application's stability or the user experience. By continuously right-sizing and embracing modern instance types, you build a much more efficient and cost-effective infrastructure.
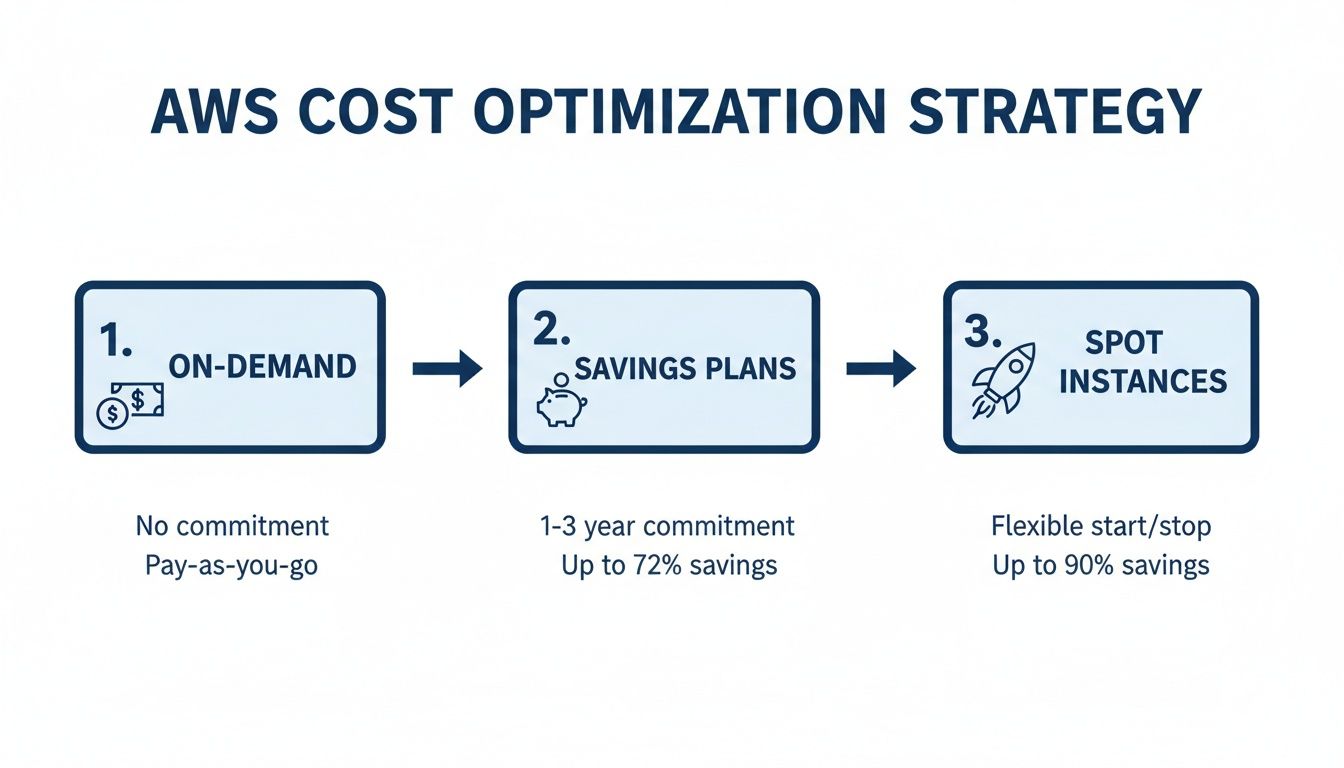
Mastering Compute Costs with Smart Purchasing Options
If you're only using On-Demand pricing, you're essentially paying the full sticker price for a car every time you take it for a spin. It's great for flexibility, but it's by far the most expensive way to run your compute resources. To really slash your AWS costs, you need to shift from that reactive, pay-as-you-go mindset to a proactive strategy that blends different purchasing models.
This is all about getting comfortable with AWS's big three discount tools: Savings Plans, Reserved Instances (RIs), and Spot Instances. Each is designed for a specific job, and learning how to mix and match them is the secret to unlocking serious savings on that compute bill.
Savings Plans and Reserved Instances for Predictability
For your workloads that are always on and predictable, committing to usage is a no-brainer. This is where Savings Plans and Reserved Instances come in, offering you a hefty discount in exchange for a one or three-year commitment.
- Savings Plans are the flexible powerhouse. You commit to a certain dollar amount of compute spend per hour (say, $10/hour), and that discount automatically covers your EC2, Fargate, and Lambda usage. The best part? It applies across instance families, sizes, and even regions, making it a perfect fit for modern, dynamic environments.
- Reserved Instances (RIs) are a bit more rigid but can sometimes squeeze out a slightly deeper discount. With RIs, you're reserving specific instance types in a specific Availability Zone (like three
m5.largeinstances inus-east-1a). They really only make sense for workloads you know are rock-solid and won't change for the entire term.
Honestly, for most folks, Savings Plans are the best place to start because of that flexibility. You can learn more about how they work in our deep dive on AWS Savings Plans.
Spot Instances for Maximum Savings
Now, for any workload that can handle an interruption, Spot Instances are your secret weapon. We're talking savings of up to 90% compared to On-Demand prices. Spot Instances let you tap into AWS's spare EC2 capacity, but there's one catch: AWS can take it back with just a two-minute warning.
This makes them a fantastic match for fault-tolerant jobs, including:
- Batch processing and big data analysis
- Media rendering
- CI/CD pipelines and various testing environments
- Stateless web apps managed by an autoscaling group
The key takeaway is that the savings are so massive, it’s often worth the effort to architect your applications to be resilient to these interruptions.
Blending Models for a Hybrid Strategy
The most cost-effective cloud strategies never stick to just one purchasing model. The real magic happens when you create a layered approach, matching the right model to the right workload.
A smart hybrid strategy covers your absolute baseline compute with a Savings Plan. Then, you handle intermittent or fault-tolerant tasks with Spot Instances, and use On-Demand only for those spiky, unpredictable workloads that absolutely cannot be interrupted.
This blended approach delivers the best of all worlds: deep discounts for your steady-state usage, huge savings for jobs that can be paused, and total flexibility for everything else. It’s a far more sophisticated and effective way to manage your cloud spend.
The problem is, many organizations don't get this far. Compute costs often eat up 60% or more of a company's total AWS bill, making it the most critical area to get right. Yet, the median effective savings rate for compute is only around 15%. Over half of companies trying to optimize just use a simple Savings Plan-only strategy, leaving a ton of money on the table. You can dig into the data behind this optimization gap in this 2025 compute rate report. This just goes to show why mastering a multi-faceted purchasing strategy is essential for any business serious about getting its cloud spend under control.
Automating Savings by Scheduling Idle Resources
Once you’ve locked in better pricing with purchasing models, the next big win is tackling a surprisingly common source of waste: paying for servers that nobody is using.
Your development, staging, and testing environments are the lifeblood of innovation, but they almost never need to be running 24/7. Simply shutting these non-production resources down during nights and weekends is one of the fastest, most effective ways to slash your AWS bill.
We’re talking about a massive area of unnecessary spending here. A typical non-production server left running around the clock can have its monthly cost cut by over 70% just by powering it down during off-hours. It’s a direct, immediate saving that doesn’t require any complex architectural changes.
This diagram shows the typical journey to optimize AWS costs, starting with basic On-Demand pricing and moving toward more sophisticated models.
Setting Up Schedules with Native AWS Tools
AWS does offer a native solution for this called the AWS Instance Scheduler. It's a template you deploy into your account with AWS CloudFormation, which then sets up all the necessary plumbing: a DynamoDB table for schedules, a Lambda function to do the work, and CloudWatch rules to trigger it.
To make it work, you manage schedules by applying specific tags to your EC2 and RDS instances. For instance, you could create a tag like Schedule=uk-office-hours and then configure that schedule in the DynamoDB table to run instances only from 9 AM to 5 PM GMT, Monday through Friday.
The Headaches of the Native Approach
While the AWS Instance Scheduler is functional, it comes with a lot of operational baggage. For many teams, especially as they grow, the practical challenges can quickly outweigh the benefits.
- It's Seriously Complex: The setup and day-to-day management are far from straightforward. You configure schedules by manually editing entries in a DynamoDB table, a process that is clumsy and prone to errors for anyone who isn't a seasoned AWS pro.
- No User Interface: Forget a friendly dashboard. All management happens through the AWS Management Console, which is a non-starter for project managers or QA leads who just need to adjust a schedule.
- It Creates Security Risks: Need to let a developer override a schedule for a late-night testing session? You often have to grant them broad console permissions. This can expose sensitive parts of your environment, creating a completely unnecessary security risk just to manage an on/off switch.
The real issue with native tools is that they’re built by engineers, for engineers. They solve the technical problem of scheduling, but they completely miss the human factors of usability, accessibility, and safe delegation.
A Simpler Alternative for Better Savings
The clunky nature of native tools has opened the door for dedicated third-party scheduling platforms like CLOUD TOGGLE. These solutions are built from the ground up to eliminate the operational hurdles and deliver savings with a fraction of the effort. The goal is to make scheduling as easy as setting an event in your calendar.
Before we get into the advantages, take a look at this comparison between the native tool and a dedicated platform.
Comparing AWS Instance Scheduler and CLOUD TOGGLE
The differences in setup and management become pretty clear when you see the features side-by-side.
| Feature | AWS Instance Scheduler | CLOUD TOGGLE |
|---|---|---|
| Setup Process | Multi-step CloudFormation deployment, manual DynamoDB configuration. | Connect your cloud account in minutes with an intuitive wizard. |
| User Interface | None. Management is via AWS Console and DynamoDB. | Clean, visual dashboard for all schedules and resources. |
| Schedule Management | Requires manual edits to a DynamoDB table; error-prone. | Point-and-click calendar interface. |
| User Access | Requires granting broad IAM permissions in the AWS Console. | Role-Based Access Control (RBAC) to grant specific permissions. |
| Manual Overrides | Requires console access and permissions; no simple "toggle". | One-click "override" button for authorized users; auto-resumes schedule. |
| Multi-Cloud Support | AWS only. | Manages AWS, Azure, and GCP from a single interface. |
| Maintenance | Self-managed; you are responsible for updates and troubleshooting. | Fully managed SaaS; updates and maintenance are handled for you. |
As the table shows, a dedicated tool is designed for usability and safety, not just technical function.
The key advantages of using a dedicated tool really shine through:
- Intuitive UI: A user-friendly dashboard lets anyone create, view, and modify schedules in seconds. No need to ever touch the AWS console.
- Precise Scheduling: Set up complex schedules, like running servers only on certain days within exact time windows, all through a simple point-and-click interface.
- Role-Based Access Control (RBAC): Grant specific users or teams permission to override schedules for their resources without giving them the keys to the kingdom. This empowers your teams while keeping your environment secure.
- Safe Overrides: When a developer needs to work late, they can temporarily override the shutdown schedule for their server with a simple toggle. The system automatically puts the server back on its schedule the next day. No manual intervention required.
For a closer look at the setup process, check out our guide on how to schedule AWS instances.
By automating the shutdown of idle resources with a tool designed for people, you do more than just lower your AWS bill. You free up your engineering team from the drudgery of managing complex scheduling scripts and turn cost optimization into a simple, collaborative process everyone can participate in.
Building a Culture of Cost Awareness with FinOps
Technical fixes like scheduling and rightsizing are great for quick wins, but they often just treat the symptoms of a high AWS bill. For real, long-term savings, you need something deeper: a cultural shift that puts financial accountability right at the heart of your engineering process. This is the core idea behind FinOps.
FinOps isn't about the finance team policing engineers. Not at all. It’s a collaborative practice that gets engineering, finance, and operations talking to each other. The whole point is to make cost a visible, shared metric so teams can make smarter, cost-conscious decisions from the moment they start building.
Establishing Shared Accountability
The first move is to tear down the old walls where engineers build whatever they want, and finance just gets a surprise bill at the end of the month. In a FinOps model, cost becomes a key performance indicator for development teams, sitting right alongside performance and reliability. This creates a powerful feedback loop where the people building the infrastructure are also the ones responsible for its efficiency.
This model of shared accountability just plain works. When developers can see the cost impact of their architectural choices in near real-time, they naturally start optimizing for it. Suddenly, cost management isn't a reactive, once-a-quarter audit; it's a continuous, proactive part of daily operations.
The core principle of FinOps is simple yet powerful: make cloud cost a first-class metric. When teams can see, understand, and own their spending, they are empowered to innovate more efficiently and drive better business value.
Practical Steps to Implement FinOps
You don’t need a massive, top-down reorganization to get started with FinOps. You can build momentum and show value fast with a few practical steps.
- Create Cost Allocation Dashboards: Use the tagging strategy you already have to build dashboards in AWS Cost Explorer. Break down spending by project, team, or application, and then make those dashboards public and easy for everyone to find.
- Set Up Proactive Budgets: Use AWS Budgets to set spending thresholds for different teams or projects. The real magic is configuring alerts that ping stakeholders in Slack or via email when costs are projected to go over budget. This lets them step in before it's too late.
- Hold Regular Cost Review Meetings: Get key folks from engineering and finance together for a brief meeting each month. Look at the cost dashboards, talk about any weird spikes in spending, and just as important, celebrate the wins when a team finds a clever way to optimize.
Creating a Simple Governance Policy
A lightweight governance policy can provide clear guardrails without bogging down development. It just makes the expectations clear and ensures everyone is on the same page about how to manage cloud resources. A simple policy should define the rules for a few key activities.
For instance, your policy could mandate:
- Mandatory Tagging: All new resources must be tagged with
Owner,Project, andEnvironment. Anything untagged gets automatically flagged for review. - Scheduled Downtime: All non-production environments are required to have an automated shutdown schedule. No exceptions.
- Unused Resource Cleanup: A process is in place to identify and delete unattached EBS volumes or idle load balancers after 30 days of inactivity.
This approach weaves cost optimization directly into your company’s operational DNA. As you get more comfortable, you can explore more advanced strategies. For example, understanding how to apply Leveraging AI and Automation in FinOps can help you analyze data and find deeper savings. By building this culture of cost awareness, you ensure your efforts to cut AWS costs are sustainable, scalable, and driven by the entire organization.
Answering Your Top AWS Cost Questions
When you're trying to get a handle on cloud spending, a few key questions always come up. Getting straight, practical answers is the first step toward getting your AWS costs under control and building better financial habits. Let's tackle some of the most common ones.
What's the Fastest Way to Reduce My AWS Bill?
Hands down, the quickest win is to stop paying for things you aren't using. The biggest culprits are almost always your non-production environments, think development, staging, and QA servers, that are left running 24/7.
Setting up a scheduler to automatically shut these down overnight and on weekends is the most direct path to savings. It's a simple change that can slash the cost of those specific resources by up to 70% right out of the gate, with very little effort.
How Often Should I Review My AWS Costs?
For most teams, a monthly review is a great place to start. It's the right cadence to dive into a tool like AWS Cost Explorer, spot spending trends, and catch any surprise spikes without it feeling like a chore.
As your team gets more comfortable with FinOps practices, you might find yourself shifting to weekly check-ins for your biggest projects or most critical services. The goal is to make cost a normal part of your operational rhythm, not a panic-inducing event at the end of the month.
Are Savings Plans Better Than Reserved Instances?
This really comes down to how predictable your workloads are and how much flexibility you need. There's no single right answer, but here's the breakdown.
- Savings Plans are built for flexibility. They give you a discount that automatically applies to your EC2, Fargate, or Lambda spend in a specific region, no matter which instance family you end up using.
- Reserved Instances (RIs) can sometimes offer a slightly deeper discount, but they come with a catch: you're locked into a specific instance family and Availability Zone.
For most modern applications where things are constantly changing, the flexibility of Savings Plans usually makes them the smarter choice. They just roll with the punches as your infrastructure evolves, which means less manual management and fewer headaches down the road.
Ready to stop paying for idle servers and see immediate savings? CLOUD TOGGLE makes it easy to automate server schedules, control access, and reduce your AWS bill with just a few clicks. Start your free trial and see how much you can save at https://cloudtoggle.com.