Before you deploy a single resource, the Azure Cost Calculator is your go-to tool for mapping out what you're likely to spend. It’s all about turning abstract pricing models into a concrete budget, helping you estimate costs for virtual machines, storage, and networking before you get the bill.
Why Your Cloud Budget Needs the Azure Cost Calculator

It’s an all-too-common story: a company gets blindsided by a massive cloud bill, turning a powerful asset into a financial headache. The Azure Cost Calculator is your first line of defense against these budget blowouts. Think of it less like a simple calculator and more like a strategic partner for your entire cloud journey.
This tool is a cornerstone of FinOps, bringing much-needed clarity to Azure's notoriously complex pricing. It gives you the power to model different scenarios, compare service configurations, and make smart decisions before committing a single dollar to your architecture.
Proactive Financial Planning
The real magic of the calculator is that it puts you in a proactive position. Instead of reacting to a shocking bill at the end of the month, you’re planning ahead and aligning your technical architecture with your financial guardrails from day one.
This process lets you:
- Avoid budget surprises by generating a clear forecast of your monthly expenses.
- Compare service tiers to see the real cost difference between options, like choosing Standard HDDs versus the much pricier Premium SSDs.
- Model different usage patterns to understand how costs will fluctuate based on demand and operating hours.
Just as a good interactive calculator for your website can turn complex variables into clear answers for a user, the Azure calculator does the same for your cloud budget. It’s the foundational step that makes meaningful cost optimization possible later on.
The goal isn't just to see what you might spend, but to actively shape what you will spend. The calculator is the bridge between technical decisions and financial outcomes.
Highlighting Idle Waste
One of the most immediate "aha!" moments the calculator provides is just how much idle waste costs. We're talking about resources you pay for that aren't actively being used, a massive problem in non-production environments like development, testing, and staging.
When you first add a virtual machine to your estimate, the calculator defaults to 730 hours of uptime per month, assuming it runs 24/7. That initial number can be a shocker, but it also reveals a huge opportunity for savings.
It shows you exactly how much you’re paying for that dev server to sit idle all night and on weekends. This is where you can see the potential ROI of automating schedules with a tool like CLOUD TOGGLE, which turns that theoretical saving into real dollars back in your budget.
Estimating Your Core Compute and Storage Costs
Let's walk through a real-world estimate for a small web app's compute and storage using the Azure Pricing Calculator. This is where the rubber meets the road.
I'll show you how to pick the right VM series, dial in the CPU and RAM, and most importantly, define uptime to get an accurate forecast.
Choosing The Right VM Configuration
Sizing a virtual machine is all about finding that sweet spot between CPU cores and memory for your specific workload. Get it wrong, and you're either paying for power you don't need or bottlenecking your application.
For a simple web app, you might start with a B1ms series VM for light, burstable use. If you expect more consistent traffic, something like a D2s_v3 is a more robust starting point.
Next up is the most overlooked setting: the runtime hours. This is your biggest lever for cost control.
- 24/7 runtime (730 hours) is the default and reflects a machine that's always on.
- Business hours only (~200 hours) is perfect for development, testing, or internal tools used during a typical 9-to-5 workday.
Here’s a quick look at where you'll find these settings in the Azure Pricing Calculator.
As you can see, simply adjusting those runtime hours has a massive impact on the final estimated cost. It’s the easiest win you’ll find.
Estimating Storage Costs
Your storage costs come down to three things: disk type, capacity, and how many transactions you run.
A Premium SSD will cost you more per gigabyte, but it's built for the fast I/O operations per second (IOPS) that production workloads demand. In contrast, a Standard HDD is much cheaper but will feel sluggish for anything I/O-intensive.
- Choose SSD when low latency is a must-have for your application.
- Pick HDD for backups, archival, or infrequently accessed data where speed isn't a priority.
A pro tip: The Azure Cost Calculator defines a standard month as exactly 730 hours for VM availability. This is a crucial number for anyone forecasting compute spend. Just by changing this to 365 hours, you can often slice your costs in half. If you want to dive deeper into Azure cost forecasting, this guide from Flexera has some great insights.
For more advanced strategies, check out our dedicated Azure virtual machine pricing guide.
Small adjustments to your VM's uptime can slash your compute costs by over 50%. It’s the low-hanging fruit of cloud savings.
Analyzing Cost Tradeoffs
Comparing a full 24/7 schedule to a limited one really shines a light on the potential savings.
Running a B1ms virtual machine for 730 hours a month might set you back around $80. But does it really need to be on all the time?
- Full uptime gives you maximum availability but also comes with the maximum price tag.
- Reduced hours trim your bill significantly without impacting core operations if the workload isn't customer-facing 24/7.
Comparing Uptime Scenarios
Let's put some hard numbers to it. Here’s how uptime directly translates to cost for our example VM.
| Uptime Hours | Estimated VM Cost |
|---|---|
| 730 | $80 |
| 200 | $22 |
That's a 72% cost reduction just by switching to a business-hours schedule. The process is simple:
- Plug your VM series details into the Azure Cost Calculator.
- Set the hours to match your actual expected uptime.
- Review the instance size and adjust if needed for performance.
Bringing It All Together
Once you combine your compute and storage estimates, you start to get a realistic picture of your monthly budget.
For our small web app example, the VM and its disk would cost roughly $102 per month for 24/7 uptime. By shifting to a business-hours schedule, that cost plummets to just $44.
- Your VM cost is driven by its series and runtime hours.
- Your disk price depends on capacity and performance tier.
- You can cut both further with Savings Plans or Reserved Instances.
The best part? You can automate this. Using a tool like CLOUD TOGGLE lets you set these schedules and forget about them, locking in those savings without any manual intervention.
By automating schedules with CLOUD TOGGLE, you guarantee you'll never pay for idle compute again.
From here, you can continue modeling other services like networking, databases, and monitoring to build complete confidence in your budget.
Modeling Costs for Different Deployment Scenarios
A single estimate gives you a snapshot, but the real strategic value of the Azure Cost Calculator comes from comparing multiple scenarios. When you model out different deployment sizes, you start to see exactly how costs scale and what the major expense drivers are, long before you deploy a single resource. This is how engineering leaders and FinOps teams make smarter architectural decisions right from the start.
Let's walk through three common use cases: a small dev environment, a mid-sized production application, and a large-scale deployment.
Small Development Environment
For a small dev setup, it's all about being lean. You need just enough horsepower for coding and testing, without the constant drain of a production-grade machine that's sitting idle most of the time.
A typical estimate would probably include:
- One small VM: A burstable B-series instance, like a B1s or B2s, is often the perfect fit here.
- Limited uptime: This is the most important part. You’ll want to set the runtime to business hours only, which works out to around 176 hours per month (8 hours/day, 5 days/week).
- Basic storage: A small Standard HDD or a low-tier Standard SSD is usually all you need for a dev disk.
- Minimal networking: You'll have some outbound data transfer, but it’s typically very low in a dev scenario.
This kind of setup prioritizes thriftiness, making absolutely sure you’re not paying for resources on nights and weekends when nobody is using them.
The chart below shows just how massive the cost difference is between running a VM 24/7 versus only during business hours.
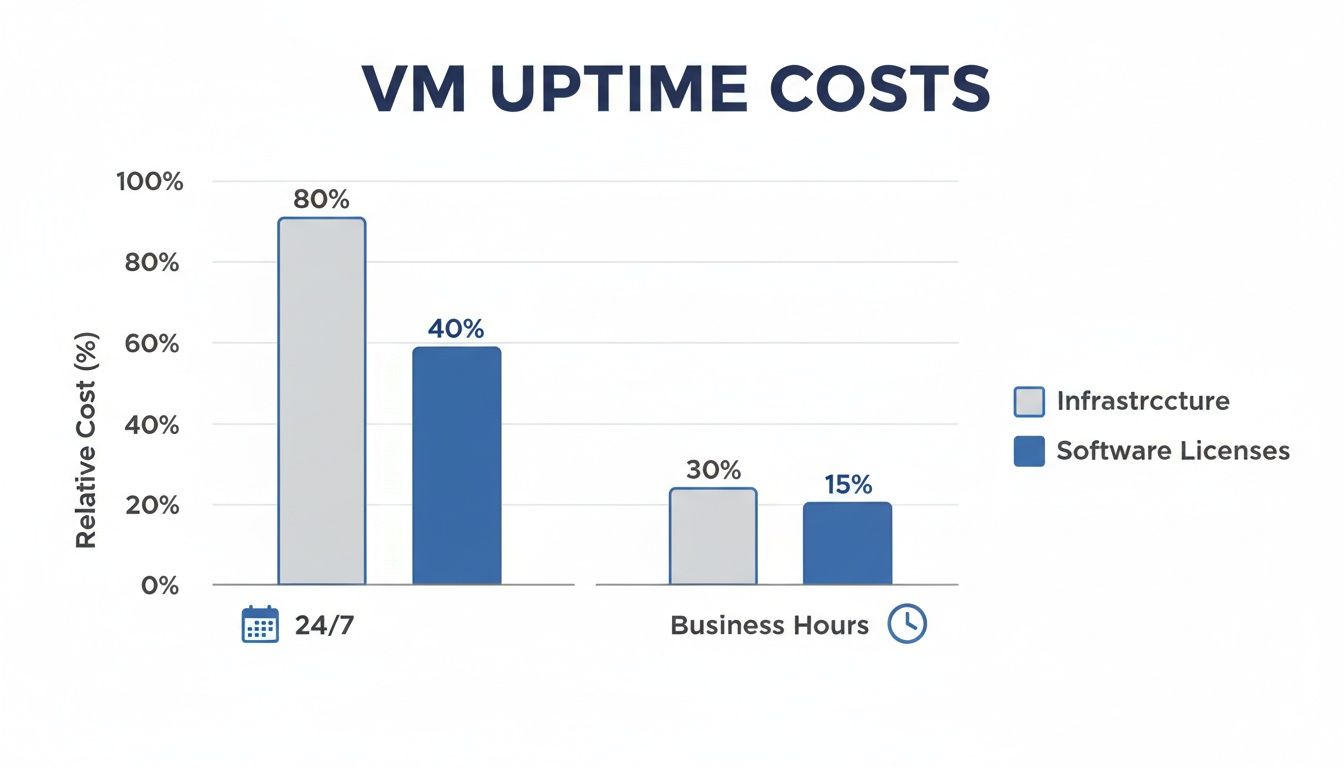
As you can see, simply scheduling your non-production VMs to run only when they're actually needed can slash your infrastructure bill by more than half.
Mid-Sized Production Application
Once you move to a mid-sized production app, the focus shifts. It's no longer about pure cost-cutting; it's about finding the right balance between performance, reliability, and cost. This means bringing in more robust services.
Your estimate will now start to look a bit different:
- Multiple App Service instances: For web hosting, you'll be looking at a production-tier plan to handle real traffic.
- A managed database: Something like Azure SQL Database or Azure Database for PostgreSQL, with a service tier that matches your expected load.
- Premium Storage: You'll want Premium SSDs for your VMs to guarantee fast and reliable I/O for your application data.
- Content Delivery Network (CDN): A CDN helps improve global performance and, just as importantly, reduces the outbound data transfer costs from your primary region.
Storage costs can get complicated, so it's worth taking a closer look at how Azure Blob Storage pricing works and how it fits into your overall budget.
Large-Scale Deployment
At a large scale, your cost model becomes a complex beast, pulling in services designed for high availability, tight security, and global reach.
At this level, the Azure Cost Calculator stops being just a budgeting tool. It transforms into an architectural planning canvas where you can visualize the financial impact of every single technical decision you make.
Your estimate will expand significantly to include things like:
- Load Balancers and Application Gateways to distribute traffic effectively and ensure high availability.
- Azure Kubernetes Service (AKS) clusters to manage containerized applications at scale.
- Multiple storage types, including Blob Storage for objects, Azure Files for shared access, and maybe Cosmos DB for a globally distributed NoSQL database.
- Enhanced security services like Azure Firewall and DDoS Protection to properly safeguard your application.
- Extensive data egress costs, modeled for traffic moving across different regions or out to the internet.
By building out and comparing these three distinct scenarios, you get a crystal-clear picture of what drives your costs at each stage of your company's growth.
Sample Azure Cost Estimates by Deployment Size
To put it all together, here’s a high-level look at how monthly costs might break down across our three scenarios. These are illustrative estimates, but they show how the budget shifts from being compute-heavy at the start to a more balanced mix of services at scale.
| Service Category | Small Dev Environment (Est. Cost) | Mid-Sized Production App (Est. Cost) | Large-Scale Deployment (Est. Cost) |
|---|---|---|---|
| Compute (VMs, App Service) | $25 – $50 | $300 – $600 | $2,500 – $5,000+ |
| Databases (SQL, Cosmos DB) | $15 | $150 – $400 | $1,000 – $3,000+ |
| Storage (Disks, Blobs) | $5 – $10 | $50 – $150 | $500 – $1,500+ |
| Networking & Security | $5 | $100 – $250 | $800 – $2,000+ |
| Total Estimated Monthly Cost | ~$50 | ~$600 – $1,400 | ~$4,800 – $11,500+ |
Modeling these different stages is a powerful exercise. It not only helps with immediate budgeting but also informs your long-term architectural strategy, ensuring you build a solution that's not just powerful, but also financially sustainable as you grow.
Unlocking Savings with Reservations and Savings Plans

While Pay As You Go is great for flexibility, it's also the most expensive way to run your cloud resources. To really get strategic with your budget, you need to look at Azure's commitment-based discounts: Reserved Instances and Savings Plans. These are your heavy hitters for slashing costs on workloads that are always running.
The Azure Cost Calculator is the perfect tool for seeing these savings in black and white. Instead of just accepting the default on-demand price, you can directly compare it against a one- or three-year commitment. The difference is often staggering, making this a critical step for any business that's serious about its cloud budget.
Reserved Instances vs. Savings Plans
So, what's the difference between these two? Both offer deep discounts, but they provide flexibility in different ways. Picking the right one depends entirely on your workloads.
-
Azure Reserved Instances (RIs) are for when you know exactly what you need. You're reserving a specific virtual machine type in a specific Azure region for a one- or three-year term. This is perfect for static workloads, like a production database server that isn’t going to change anytime soon.
-
Azure Savings Plans offer a bit more wiggle room. You commit to a fixed hourly spend on compute services for one or three years. The discount then automatically applies to a wide range of compute services across different regions, right up to your hourly commitment amount.
The bottom line is this: Use Reserved Instances for highly predictable, specific resources. Use Savings Plans when you have a predictable overall compute spend but need the flexibility to change VM families or regions down the road.
By committing your spend, the Azure Pricing Calculator can show you discounts of up to 72% compared to Pay As You Go prices. That’s a massive saving. For example, while 2TB of storage might run you $300.55 per month on-demand, reservations can cut that figure dramatically if your demand is stable. You can see how these trends emerge by managing Azure costs with detailed reporting.
Identifying the Right Workloads
The best candidates for these discounts are your steady-state, "always-on" resources. Think about your core production web servers, critical databases, or application gateways that handle constant traffic. These are the workhorses of your infrastructure, and they shouldn't be paid for at a premium.
Before you commit, spend some time in Azure Cost Management. Look for resources that have been running consistently for the last 60 to 90 days. These are your prime candidates for a reservation or savings plan.
Don't forget to stack your discounts, either. The Azure Hybrid Benefit is another powerful tool that lets you use your on-premises Windows Server and SQL Server licenses in Azure, layering even more savings on top of your reservations. Combining these strategies is how you truly maximize your cost efficiency.
Turning Your Forecasts Into Real Savings
An estimate from the Azure Cost Calculator is a great first step, but it’s just that, an estimate. The real magic happens when you connect that forecast to your actual monthly bill, turning potential savings into money back in your budget. Think of your estimate not as a final number, but as a baseline for smart financial management.
When you start comparing your calculator forecasts against the real bills inside Azure Cost Management, you create a powerful feedback loop. This simple act immediately shows you where your initial assumptions might have been off. Maybe a service chewed through more data transfer than you planned, or a VM needed a beefier performance tier to keep up.
This kind of continuous review is the absolute heart of good cloud financial governance. To really make your forecasts work for you, you need to embrace the broader idea of cloud cost optimization. It’s all about making sharp, data-driven decisions that line your cloud spending up with what your business is trying to achieve.
Analyzing Historical Data to Refine Forecasts
Your past spending is one of the best fortune tellers for your future costs. The Azure Cost Analysis tools are built for this, showing that looking back at the last 31 days of data can predict your next monthly charges with surprising accuracy. It helps you catch weird spikes before they become a real problem.
Drilling down into the daily view often uncovers fascinating patterns. For instance, you might see that your Friday costs are consistently 15% higher than on Mondays. That’s not just a random stat; it's predictive gold that tells you a story about your team's usage patterns. You can learn more about how to use Azure Monitor for cost analysis to find these nuggets yourself.
This is how you find those expensive, easy-to-miss problems, like that dev server someone forgot to shut down over a long weekend. Once you spot these spikes in your usage data, you can fix the root cause and feed that knowledge back into your next forecast for a much more realistic picture.
A forecast is a hypothesis about your cloud spending. Your actual bill is the experiment's result. Use the results to build a better hypothesis next time.
Connecting Estimates to Automated Savings
And this is where it all comes full circle. The Azure Cost Calculator is brilliant at showing you the potential savings from a change. It can spell out in plain dollars and cents that running a development server for 40 hours a week instead of the full 168 will slash your compute costs by over 75%.
But that 75% saving is purely theoretical until you actually do something. Relying on people to manually shut down resources is a recipe for failure, it's inconsistent and just doesn't scale.
This is exactly why a tool like CLOUD TOGGLE exists. It takes the "what if" scenario you modeled in the calculator and makes it your new reality.
By setting simple on/off schedules, CLOUD TOGGLE guarantees those non-production VMs are only running when they’re actually needed. It turns the theoretical savings you found in your forecast into actual, measurable reductions on your monthly Azure invoice. It closes the loop between planning and execution.
Answering Your Questions About the Azure Cost Calculator
When you start digging into the Azure Cost Calculator, a few common questions always pop up. It's one thing to estimate a simple VM, but things get tricky when you're modeling a real-world production environment. Let's tackle some of the most frequent queries to help you build more reliable cost forecasts.
How Accurate Is This Thing, Really?
The calculator itself is incredibly precise, the numbers it uses for each service are the real deal. The accuracy of your final estimate, however, comes down to one thing: the quality of your inputs.
Think of it this way: the tool is only as good as the assumptions you feed it. If you guess you'll transfer 100 GB of data but your app actually pushes out 200 GB, your final bill is going to be higher. It's not the calculator's fault; it's a forecasting challenge.
Your first estimate should be treated as a solid baseline. The real magic happens when you start comparing your forecasts against your actual usage in Azure Cost Management. Use that real-world data to refine your assumptions, and your next estimate will be that much sharper.
What Are the Most Common Mistakes People Make?
By far, the biggest and most common mistake is leaving Virtual Machines at the default 730 hours per month. This assumes your machine runs 24/7, which is rarely true for development, testing, or staging environments. That single oversight can inflate your estimate so much that it creates unnecessary panic about the budget.
A few other classic slip-ups include:
- Forgetting the small stuff: It's easy to overlook ancillary costs like data egress, storage transactions, or dependent services like Azure Monitor and Backup. Individually they're small, but together they can pack a punch.
- Ignoring the big discounts: Many people only model the Pay-As-You-Go price, completely missing the massive savings available through Reserved Instances or Savings Plans for stable, predictable workloads.
Always look beyond the default Pay-As-You-Go pricing. Forgetting to check for Reserved Instances is like leaving a potential 70% discount on the table for your most consistent expenses.
Can I Use the Calculator for a Multi-Cloud Environment?
In short, no. The Azure Cost Calculator is built for one thing: estimating the cost of Azure services. It's a native tool for a native ecosystem and has no idea what AWS or Google Cloud charge.
But that doesn't mean it's useless in a multi-cloud strategy. You can absolutely use it for cost comparisons. The process is manual, but straightforward: model a specific workload with all its required specs in the Azure calculator, then turn around and build the exact same configuration in the AWS and GCP native calculators. This gives you a true side-by-side comparison for that specific workload. For ongoing management of a live multi-cloud environment, you’d typically look to a third-party FinOps platform to get that single pane of glass view.
How Is This Different from the TCO Calculator?
While both tools are about money, they answer very different questions.
The Pricing Calculator is for building a future-state estimate from the ground up. You tell it, "I'm going to need these specific Azure services," and it helps you forecast what that will cost. You are designing a new solution in the cloud.
The Total Cost of Ownership (TCO) Calculator, on the other hand, is a comparison tool. It's designed to help you figure out the potential savings of moving your existing on-premises infrastructure to Azure. You feed it details about your current servers, storage, and networking hardware, and it provides a high-level financial analysis comparing your current world to a future one on Azure.
Ready to turn your cost forecasts into real, automated savings? CLOUD TOGGLE helps you automatically power down idle non-production resources, ensuring you only pay for what you actually use. Start your free trial and see how much you can save at https://cloudtoggle.com.