Autoscaling in Kubernetes is all about automatically adjusting your compute resources to match what your application actually needs, right now. It means dynamically adding or removing resources, like pods or nodes, to handle traffic spikes gracefully and, just as importantly, to save money when things quiet down. It's the secret sauce for building efficient, tough, and cost-effective systems on Kubernetes.
Why Do We Need to Scale Dynamically?
Imagine a retail store that could instantly open new checkout lanes the moment a holiday rush begins and then magically close them when the store is empty. That's the big idea behind autoscaling in Kubernetes. Without it, you're stuck with static resource allocation, a constant guessing game that almost always ends badly.
The old way forces you into a tough spot. You could overprovision, keeping a ton of servers running 24/7 just in case traffic surges. This keeps performance high, but it’s a massive waste of money on idle infrastructure, a huge headache for any FinOps team. In fact, idle cloud resources are often a huge chunk of a company's cloud bill.
Or, you could underprovision to cut costs. That works fine… until it doesn't. An unexpected spike in traffic hits, your application slows to a crawl or crashes, and you’re left with unhappy users and lost revenue.
The Autoscaling Solution
Autoscaling gets you out of this bind by creating a system that breathes right along with your application's workload. It replaces guesswork with a responsive, automated way to manage resources. This is a game-changer for DevOps and FinOps teams who are constantly trying to deliver reliable services without getting slammed by a surprise cloud bill.
The real magic of autoscaling is how it aligns what you use with what you actually need. It gets rid of that painful trade-off between overspending for peak capacity and risking downtime to save a few bucks. The result is a much smarter, more resilient infrastructure.
This dynamic approach is at the heart of modern cloud operations. Effective orchestration in cloud computing, which you can read more about in our guide, depends on automated systems like this to manage complex applications. Autoscaling is a perfect example of orchestration doing its job.
Different Layers of Scaling
To really get a handle on autoscaling, it helps to know that it works on a couple of different levels within your Kubernetes environment. Each layer tackles a different part of the resource puzzle:
- Pod Level Scaling: This is all about adjusting the number of your application instances (pods) or tweaking the CPU and memory they get.
- Cluster Level Scaling: This one focuses on the bigger picture, the underlying infrastructure. It automatically adds or removes entire servers (nodes) from the cluster based on the total demand from all your pods.
Once you see these distinct layers, you can start to understand how the different autoscaling tools fit together. Each has a specific role to play, and in the next sections, we'll dive into exactly how they work, from scaling individual pods all the way up to managing entire clusters.
Understanding The Core Types Of Kubernetes Autoscalers
To really get a handle on autoscaling in Kubernetes, you first need to meet the team. Kubernetes offers a powerful set of distinct autoscalers, and each one is built to solve a different piece of the resource puzzle. It helps to think of them not as competing tools, but as a specialized crew working together to keep your applications perfectly balanced, efficient, and responsive.
These tools manage scaling at different layers, from individual pods all the way down to the server infrastructure they run on. Understanding their unique roles is the key to building a truly dynamic and cost-effective system. Let's break down the four core players you need to know.
Horizontal Pod Autoscaler (HPA): The Crowd Manager
The Horizontal Pod Autoscaler (HPA) is probably the most well-known and widely used autoscaler in the Kubernetes world. Its job is simple but critical: it acts like a crowd manager for your application, adding more identical copies (replicas) of your pods when traffic gets heavy and removing them when things quiet down.
HPA makes its decisions by watching performance metrics, most commonly CPU and memory usage. When the average CPU load across all pods for a service jumps past a threshold you've set, say, 70%, HPA automatically spins up new pods to distribute the work. This approach, known as horizontal scaling, is a perfect fit for stateless applications where adding more instances directly boosts capacity.
Its popularity is well-deserved. In fact, a study from Datadog found that over 64% of organizations using Kubernetes have adopted HPA. That number keeps climbing as more teams look for ways to stop paying for idle, overprovisioned resources.
Vertical Pod Autoscaler (VPA): The Resource Nutritionist
While HPA changes the number of pods, the Vertical Pod Autoscaler (VPA) focuses on the size of each one. Think of VPA as a resource nutritionist for your pods. It analyzes their actual CPU and memory consumption over time and then recommends the ideal resource requests and limits.
This is a game-changer for right-sizing your applications. Developers often have to guess at the correct resource allocation, which leads to either waste or performance bottlenecks. VPA can run in a "recommendation" mode, where it just provides suggestions, or in an "auto" mode where it actively adjusts pod resources by restarting them with new values. For a deeper dive into these two scaling philosophies, check out our guide on horizontal vs. vertical scaling.
It's a constant balancing act between overprovisioning (wasting money) and underprovisioning (risking poor performance), as this image shows.
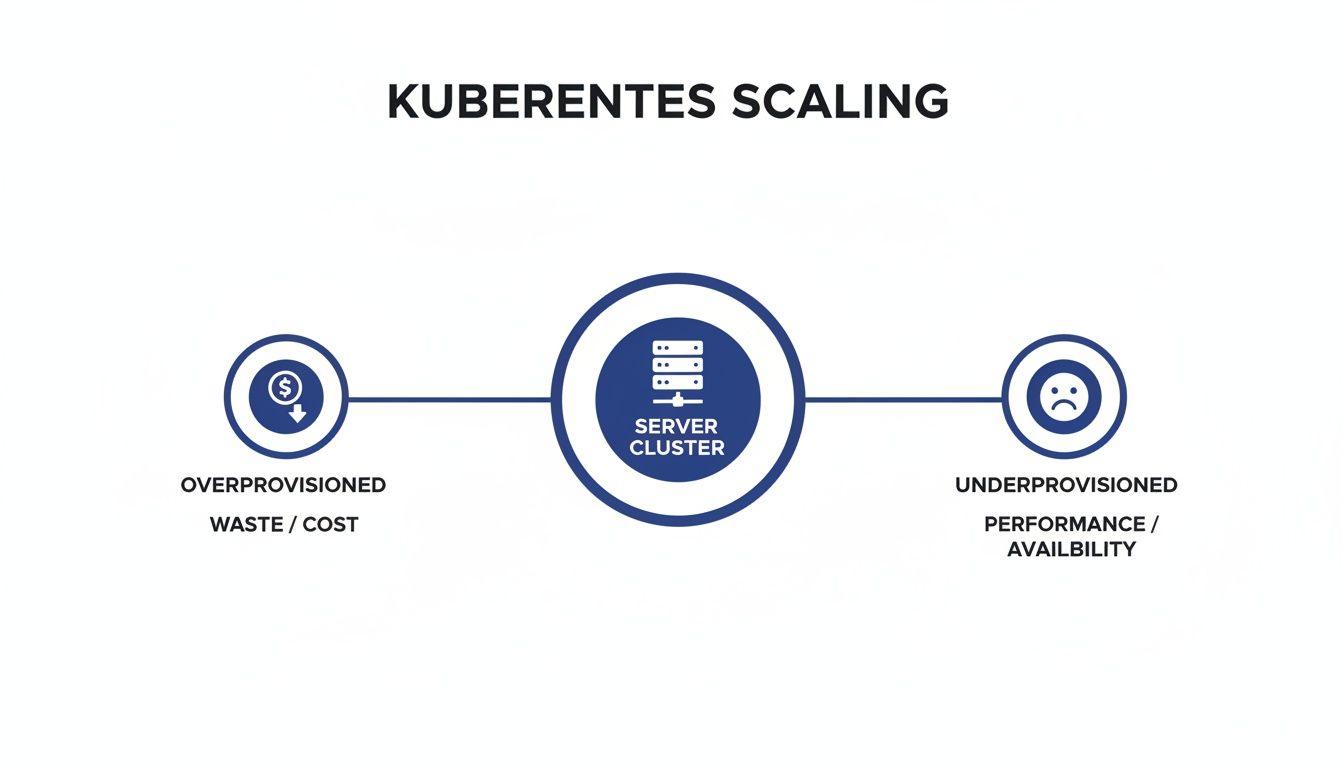
This is precisely the challenge that autoscalers like VPA and HPA are designed to solve, helping you find that sweet spot for resource allocation.
Cluster Autoscaler (CA): The Construction Manager
The Cluster Autoscaler (CA) operates one level higher, at the infrastructure layer. If HPA is the crowd manager and VPA is the nutritionist, then the CA is the construction manager for your entire cluster. Its whole job is to add or remove entire servers (nodes) to meet the overall demand.
The Cluster Autoscaler springs into action when pods can't be scheduled because there isn't enough CPU or memory available on any existing node. When it sees these "pending" pods, it works with your cloud provider (like AWS, Azure, or GCP) to provision a new node. On the flip side, if it finds a node that's been underutilized for a while and its pods can be safely moved, it will terminate that node to save you money.
Kubernetes Event-Driven Autoscaler (KEDA): The Specialist
Finally, we have KEDA, the specialist of the group. While HPA typically scales based on internal metrics like CPU, KEDA enables event-driven autoscaling. It lets you scale your applications based on external signals from dozens of different sources.
KEDA bridges the gap between your Kubernetes workloads and external event sources. It lets you scale based on business metrics, not just resource utilization.
Imagine you have a workload that processes messages from a queue like RabbitMQ or AWS SQS. With KEDA, you can configure your application to scale out based on the number of messages in the queue. If 5,000 messages suddenly arrive, KEDA can scale your workers from zero to fifty in seconds to chew through the backlog, and then scale back down to zero when the queue is empty. This makes it incredibly powerful for asynchronous and background processing jobs.
Kubernetes Autoscaler Comparison
To quickly summarize, here's how the main autoscalers stack up against each other. Each one has a specific job, and they often work best when used together.
| Autoscaler | Scaling Dimension | Primary Trigger | Best For |
|---|---|---|---|
| HPA | Pod Count (Horizontal) | CPU / Memory Usage | Web servers & stateless APIs |
| VPA | Pod Size (Vertical) | Historical Usage | Stateful apps & right-sizing |
| Cluster Autoscaler | Node Count | Pending Pods | Managing cluster capacity |
| KEDA | Pod Count (Horizontal) | External Events | Message queues & background jobs |
Choosing the right tool, or combination of tools, depends entirely on your workload. By understanding what each autoscaler brings to the table, you can build a system that is both resilient and cost-effective.
How to Configure and Implement Kubernetes Autoscalers
Moving from theory to practice is where you really see the power of Kubernetes autoscaling. Getting these components up and running isn't about complex programming; it’s more about telling Kubernetes what you want in a simple configuration file. Let's walk through some practical, commented examples to get you started with the most common autoscalers.
This section will demystify the configuration process, explaining what each line actually does. The goal is to give you the confidence to implement these powerful tools in your own environment, starting with the most popular one: the Horizontal Pod Autoscaler.
Setting Up a Horizontal Pod Autoscaler
The HPA is often the first autoscaler teams put in place. It works by scaling the number of pods in a deployment based on metrics like CPU usage. Before you can use an HPA, you absolutely must have the Kubernetes Metrics Server installed in your cluster. It's the component that collects the resource metrics the HPA needs to make decisions.
Here is a basic YAML configuration for an HPA that targets a deployment named webapp.
apiVersion: autoscaling/v2
kind: HorizontalPodAutoscaler
metadata:
  name: webapp-hpa
spec:
  # This points the HPA to the deployment it needs to scale.
  scaleTargetRef:
    apiVersion: apps/v1
    kind: Deployment
    name: webapp
  # Define the minimum and maximum number of pods.
  minReplicas: 2
  maxReplicas: 10
  metrics:
  # This is the list of metrics the HPA will watch.
  - type: Resource
    resource:
      name: cpu
      # The target value for the metric.
      target:
        type: Utilization
        averageUtilization: 75
Let's break down what this configuration is doing:
scaleTargetRef: This tells the HPA exactly which application to monitor and scale, in this case, thewebappdeployment.minReplicasandmaxReplicas: These set the guardrails for scaling. The HPA will never scale below two pods or above ten pods, no matter what.metrics: Here, we're telling the HPA to watch the average CPU utilization. When the average CPU load across all pods climbs above 75%, the HPA will start adding new pods until the average drops back to our target.
Implementing the Vertical Pod Autoscaler in Recommendation Mode
The Vertical Pod Autoscaler is fantastic for right-sizing your applications. A safe way to get started is by running it in "Recommendation" mode. In this mode, the VPA analyzes pod usage but doesn't automatically apply any changes, which prevents potential disruptions while still giving you valuable insights.
Using VPA in recommendation mode is a best practice for your initial setup. It lets you gather data on your application's actual resource needs without the risk of automated changes causing instability.
Here’s how you'd configure a VPA to provide recommendations for a deployment named api-service.
apiVersion: autoscaling.k8s.io/v1
kind: VerticalPodAutoscaler
metadata:
  name: api-service-vpa
spec:
  targetRef:
    apiVersion: "apps/v1"
    kind:       Deployment
    name:       api-service
  # Setting updateMode to "Off" enables recommendation-only mode.
  updatePolicy:
    updateMode: "Off"
In this example, the key is the updateMode: "Off" line. This tells the VPA to just observe the api-service pods and generate recommendations for the optimal CPU and memory requests. You can then check these suggestions by inspecting the VPA object and use them to manually fine-tune your deployment's resource settings for better efficiency.
Understanding Cluster Autoscaler Prerequisites
Unlike the pod-level autoscalers, the Cluster Autoscaler (CA) talks directly to your cloud provider's API to add or remove entire nodes. Its setup is less about a single YAML file and more about making sure the right permissions and node group configurations are in place first.
The prerequisites typically include:
- Cloud Provider Integration: The CA needs an IAM role or service account with permissions to manage virtual machine instances in your cloud (like AWS Auto Scaling Groups or Azure VM Scale Sets).
- Node Group Discovery: You have to tag your node groups so the CA knows which ones it’s allowed to manage. This is a crucial safety measure that prevents it from accidentally scaling down a critical, manually-managed node pool.
- Correct Installation: The CA is deployed as just another application in your cluster, but it's configured with flags that specify your cloud provider and which node groups to watch.
Once it's running, the CA keeps an eye out for pods that can't be scheduled due to resource shortages. When it sees one, it automatically provisions new nodes from the tagged groups to make room for it.
Event-Driven Scaling with KEDA
KEDA (Kubernetes Event-driven Autoscaling) really shines when you need to scale workloads based on external systems, like a message queue. Let’s imagine we want to scale a worker application based on the number of messages sitting in an AWS SQS queue.
This requires a ScaledObject, which is a custom resource definition that KEDA provides.
apiVersion: keda.sh/v1alpha1
kind: ScaledObject
metadata:
  name: sqs-worker-scaler
spec:
  scaleTargetRef:
    name: sqs-processing-worker
  minReplicaCount: 0
  maxReplicaCount: 30
  triggers:
  - type: aws-sqs-queue
    metadata:
      queueURL: "YOUR_SQS_QUEUE_URL"
      queueLength: "5"
      awsRegion: "us-east-1"
      # Authentication details are usually handled via secrets
The triggers section is the heart of this configuration. It tells KEDA to monitor an SQS queue and aim for one pod for every five messages (queueLength: "5"). A really powerful feature here is setting minReplicaCount to 0. This allows KEDA to scale the workers down to nothing when the queue is empty, a concept known as scaling to zero.
Best Practices for Tuning and Optimizing Autoscaling
Flipping the switch on autoscaling is a great start, but the real magic in performance and cost savings comes from smart, continuous tuning. Just turning on an autoscaler without thoughtful configuration can cause chaos, systems that scale up and down erratically or, even worse, don't respond when you need them most. Mastering a few best practices is what turns a basic setup into a resilient and efficient machine.
It all starts with a solid foundation. You need to get your resource requests right, pick metrics that actually matter for your workload, and set up cooldown periods to keep things stable. These aren't just abstract ideas; they're proven techniques for unlocking the full potential of autoscaling in Kubernetes.

Set Proper Resource Requests and Limits
Think of accurate resource requests as the bedrock of your entire autoscaling strategy. The Horizontal Pod Autoscaler depends completely on these values to figure out utilization. If you don't tell your pods what their CPU request is, the HPA has no baseline to measure against, making it totally useless.
It's like asking the HPA to scale a pod when CPU usage hits 70%. That number is meaningless if it has no idea what 100% is supposed to be. This is a classic mistake that leaves teams scratching their heads, wondering why their autoscaler isn't kicking in.
To get this right, make sure you:
- Always define requests: Every single container in your deployment needs to have CPU and memory requests specified. No exceptions.
- Use VPA for guidance: Let the Vertical Pod Autoscaler run in "recommendation" mode. It will give you data-driven suggestions for right-sizing your requests and limits.
- Avoid setting CPU limits (usually): For most apps, setting a hard CPU limit just leads to unnecessary throttling. A well-defined request is often all you need.
Getting this first step right is a pillar of good Kubernetes management. It ties directly into the bigger picture of resource and capacity planning, which is all about making sure your cluster runs as efficiently as possible.
Choose the Right Metrics for Your Workload
While CPU and memory are the old standbys, they aren't always the best proxies for application load. A service could be getting slammed with incoming requests long before its CPU usage ever spikes.
To truly optimize your setup, you have to measure what actually matters. Look at relevant DevOps performance metrics that reflect your system's health. For example, a customer-facing API is probably better off scaling based on requests per second (RPS) or latency. On the other hand, an async worker chewing through a backlog is a perfect candidate for scaling based on the number of messages in its queue.
Your scaling metrics should reflect the business value your application provides. Tying scaling events to user-facing performance indicators like response time ensures you're adding capacity precisely when it impacts the user experience.
Configure Cooldown Periods and Behavior Policies
A tell-tale sign of a poorly tuned autoscaler is "flapping", where the system frantically scales up and down in response to tiny load changes. This doesn't just create instability; it can drive up your costs. To stop this, the HPA lets you configure cooldown periods, which it calls stabilization windows.
These settings tell the autoscaler to take a breath and wait a certain amount of time after a scaling event before it considers another one. You could, for instance, set a five-minute stabilization window for scaling down. This prevents the HPA from killing pods during a brief dip in traffic, ensuring the system doesn't overreact.
The impact of getting this right is clear across the industry. Well-tuned Kubernetes autoscaling delivers real results, with 62% of organizations reporting significant improvements after deployment. As production Kubernetes use grows to 66%, these practices are becoming more critical than ever. You can dig into more of these trends in the latest CNCF survey.
Addressing Idle Costs Beyond Standard Autoscaling
Standard autoscaling tools are brilliant at matching resources to active workloads. They make sure your app has the muscle it needs during a traffic surge and then scales back when things quiet down.
But they only solve one part of the cost puzzle. There's a huge gap that native autoscalers simply don't cover: the silent, steady cost of completely idle infrastructure.
Even after your Horizontal Pod Autoscaler scales pods down to zero and the Cluster Autoscaler terminates the now-empty nodes, entire clusters are often left running. This is a massive issue for non-production environments like development, staging, and QA. These environments are typically only needed during business hours, yet they frequently run 24/7, burning cash while nobody is even looking at them.
Take RAG (Retrieval-Augmented Generation) workloads, for example. Their usage can be incredibly "bursty," spiking during the day and then dropping to virtually nothing overnight. Without a way to manage this downtime, companies get stuck in a tough spot: either overprovision expensive GPU resources that sit idle 80% of the time or risk terrible performance when demand finally picks up.
The Proactive Strategy: Automated Scheduling
This is where automated scheduling comes in as the perfect partner to autoscaling. While reactive autoscaling handles unpredictable demand, proactive scheduling deals with predictable downtime. It’s built on a simple but powerful idea: if an environment isn't being used, it shouldn't be running.
By setting up automated schedules, you can power down entire non-production clusters during off-hours, like nights and weekends. This goes way beyond just scaling pods to zero; it’s about shutting down the underlying virtual machines completely. When you do that, all the associated costs, compute, storage, and networking, stop dead in their tracks.
This approach locks in savings that reactive tools can never guarantee on their own.
Autoscaling optimizes your costs when your application is active. Automated scheduling eliminates your costs when it's not. A complete FinOps strategy requires both.
Combining these two strategies ensures you’re not just running efficiently during peak times, but you're also aggressively cutting waste whenever there's inactivity.
Integrating Scheduling into a Complete Strategy
A truly comprehensive cost optimization plan uses both reactive and proactive methods. The two approaches work hand-in-hand to cover every scenario, from minute-by-minute traffic fluctuations to the predictable daily and weekly cycles of your business.
Here’s how they fit together:
- Reactive Autoscaling (HPA, KEDA): This is your first line of defense for active applications, managing real-time, unpredictable changes in workload demand. It handles the spikes and lulls.
- Proactive Scheduling: This is your tool for eliminating the baseline cost of non-production environments during predictable periods of inactivity.
For example, you could have an HPA managing your staging environment’s web servers from 9 AM to 6 PM. But from 6 PM until 9 AM the next morning, an automated schedule shuts down the entire cluster. This layered approach guarantees you only pay for what you actually use, moment by moment.
Platforms like CLOUD TOGGLE specialize in this, giving you an intuitive way to set these schedules without needing complex scripts and turning guaranteed downtime into guaranteed savings.
Kubernetes Autoscaling FAQs
When you start digging into Kubernetes autoscaling, a few questions always pop up. Things get especially interesting when you mix different tools or try to figure out which autoscaler does what. Getting straight answers is the key to building a scaling strategy you can actually trust.
Let's clear up some of the most common questions I hear from teams working with Kubernetes.
Can I Use HPA and VPA Together on the Same Workload?
Yes, you absolutely can, but there's a critical rule: never let them fight over the same resource. If you configure both the Horizontal Pod Autoscaler (HPA) and Vertical Pod Autoscaler (VPA) to manage CPU, for instance, they'll constantly battle each other, leading to unstable workloads. It’s a recipe for disaster.
The proven strategy is to give each one a distinct job:
- Use HPA for real-time scaling: Let HPA do what it does best, add or remove pods based on live metrics like CPU usage or incoming requests. This is your reactive, in-the-moment scaler.
- Run VPA in ‘Recommendation’ mode: Configure the VPA's
updateModetoOff. In this mode, VPA watches your pods, analyzes their actual usage, and tells you exactly what CPU and memory requests they should have. It advises, but it doesn't act.
This combination is incredibly powerful. VPA gives you the data to perfectly right-size your pods, and HPA takes those perfectly-sized pods and scales them out to handle the load. You get the best of both worlds: efficiency and elasticity.
What Is the Difference Between Cluster Autoscaler and Karpenter?
Both the classic Cluster Autoscaler (CA) and Karpenter scale your cluster's nodes, but they approach the problem from completely different angles. Understanding this philosophical difference is key to choosing the right tool for your infrastructure.
The traditional Cluster Autoscaler is group-based. It works by managing node groups you've already defined in your cloud provider, like an AWS Auto Scaling Group. When it sees pods that can't be scheduled, it simply increases the "desired" count of one of your existing node groups, spinning up another identical node. It’s predictable but rigid.
Karpenter is a whole different beast. It's a modern, "just-in-time" provisioner. Instead of relying on predefined groups, Karpenter looks at the specific needs of each pending pod: CPU, memory, architecture (like arm64), or even GPU requirements. It then provisions the most optimal, cost-effective instance type directly from the cloud provider's fleet that perfectly matches those needs.
Karpenter's approach is much more dynamic and workload-centric. It often leads to faster scaling and better "bin packing" of resources because it isn't constrained by the limitations of fixed node groups.
How Does Autoscaling Impact My Cloud Bill?
Autoscaling has a massive, direct impact on your cloud bill. When done right, it’s one of the most powerful cost-saving tools you have because it forces your spending to follow your actual usage.
It cuts costs in two main ways. First, it automatically scales down your resources when traffic is low, stopping you from paying for idle servers that are just sitting there burning cash. Second, it prevents lost revenue by ensuring your application can handle surprise traffic spikes without crashing or slowing down, which protects the user experience.
But be careful; a poorly configured autoscaler can backfire. If it's too aggressive, too slow to scale down, or constantly "flapping" between scaling up and down, it can actually increase your costs. That’s why a complete cost optimization strategy combines reactive autoscaling in Kubernetes for live workloads with proactive scheduling. By using a tool to shut down entire non-production environments when they aren't being used at all, you save money on both active and completely idle infrastructure.
Ready to eliminate cloud waste from idle non-production environments? CLOUD TOGGLE makes it easy to set up automated schedules that power off your resources when they're not needed, guaranteeing significant savings. Start your free 30-day trial and see how simple cloud cost optimization can be at https://cloudtoggle.com.