Figuring out your Amazon RDS cost can feel like trying to hit a moving target. The price you see for the database instance itself is often just the opening act. The real costs show up in the details of your final bill.
What Actually Drives Your Amazon RDS Cost?
Your monthly RDS bill isn't just one line item. It’s a combination of several different components, each billed based on how you use them. Think of it like a utility bill for your data: you're paying for the server, the storage space, the I/O activity, and the network traffic.
Once you get a handle on these core drivers, you can shift from being surprised by your bill to strategically managing your cloud spend. Every decision, from the database engine you choose to where it's physically located, directly shapes your final cost.
This diagram shows you exactly what goes into that final number.
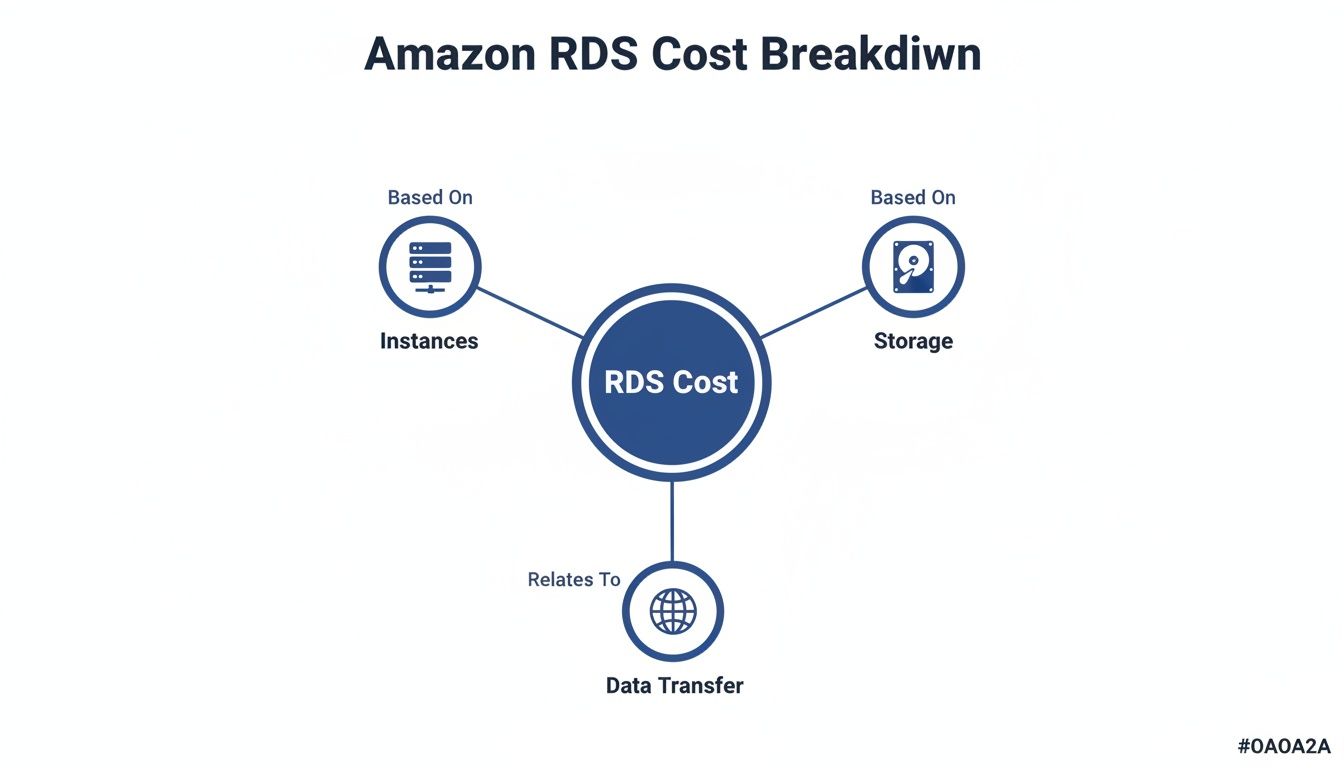
As you can see, the final bill is all about the interplay between your database instance, its storage, and the data flowing in and out. Getting these elements right is the first step to optimization.
To give you a clearer picture, let's break down how these pieces fit together. The following table summarizes the main components you'll see on your bill.
Core Components of Amazon RDS Cost
| Cost Component | What It Covers | How It Is Billed |
|---|---|---|
| Database Instance | The virtual server (CPU and RAM) that runs your database engine. | Per hour, based on instance size, family, and pricing model (On-Demand, Reserved). |
| Storage Volume | The disk space you provision for your database and its snapshots. | Per gigabyte-month (GB-month) based on the total storage allocated. |
| I/O Operations | The read and write operations your application performs against the database. | Per million I/O requests for certain storage types (like gp2 and io1). |
| Data Transfer | Data moving into and out of your RDS instance over the network. | Per gigabyte (GB). Ingress is usually free; egress (outbound) is typically charged. |
| Backups & Snapshots | Automated and manual backups of your database stored in Amazon S3. | Per gigabyte-month (GB-month) for storage exceeding your provisioned database size. |
These are the fundamental building blocks of your RDS bill. Now, let's dig into the two biggest drivers: the instance and its storage.
Database Instances: The Core Engine
The biggest chunk of your Amazon RDS cost will almost always be the database instance itself. This is the virtual server that powers your database, and AWS charges you for every hour it's running. The price is set by its size (vCPU and RAM) and its family (like general purpose or memory-optimized).
It’s amazing how much the price can swing based on your choices. For example, a tiny db.t4g.micro MariaDB instance in a Single-AZ setup costs just $0.016 per hour, which is perfect for a small dev/test environment. But if you need more power and jump to a db.m5.large, the cost climbs to $0.171 per hour, which adds up quickly for a production database that’s always on.
If you opt for Amazon Aurora, AWS's premium cloud-native database, a db.r5.large will run you $0.29 per hour. Over a full month (730 hours), that tiny MariaDB instance comes to about $11.68, while the larger m5 hits $124.83, and the Aurora instance lands at $211.70.
Your deployment choice also plays a huge role. A Multi-AZ deployment, which gives you high availability by running a live replica in a separate data center, will cost roughly double what a single instance does.
Storage and I/O: The Digital Warehouse and Its Activity
Next up is your database storage. RDS offers a few different types, and you’re billed per gigabyte-month for whatever amount you provision. The main options are:
- General Purpose SSD (gp2/gp3): A great all-rounder for most database workloads, offering a solid balance of price and performance.
- Provisioned IOPS SSD (io1/io2 Block Express): Built for I/O-hungry applications, like large OLTP databases, that need consistently high-speed performance.
With the older gp2 and io1/io2 storage types, you also get a separate charge for I/O operations, the reads and writes your database is constantly performing. This can be a major "hidden" cost if your application is very active.
The newer gp3 storage is often a better deal because it includes a baseline level of I/O performance in the storage cost, making your bill much more predictable. To get a better feel for which instance and storage combo fits your workload, you can explore our in-depth guide on the different AWS RDS instance types.
Choosing Your RDS Pricing Model On-Demand vs Reserved Instances

Beyond the instance type and storage you pick, your choice of pricing model is one of the biggest levers you can pull to control your Amazon RDS cost. AWS gives you two main options for your database instances: On-Demand and Reserved Instances. Knowing when to use each is absolutely key to keeping your cloud bill in check.
Think of On-Demand Instances as a pay-as-you-go taxi. You pay a simple hourly rate for your database, and there’s no long-term commitment. This gives you maximum flexibility, which is perfect for a few specific scenarios:
- Development and testing environments that you only run intermittently.
- Short-term projects that have a clear end date.
- New applications with unpredictable traffic where you're not yet sure about long-term capacity needs.
Of course, this flexibility comes at a cost. On-Demand rates are the highest you can pay. You’re essentially paying a premium for the freedom to start, stop, or delete your instance at a moment's notice without any penalty.
The Power of Reserved Instances
Once your database workload starts to look stable and predictable, it’s time to get serious about Reserved Instances (RIs). An RI is a lot like signing a long-term lease on your database server. By committing to a one or three-year term, you get a massive discount on the hourly rate compared to what you’d pay On-Demand.
Reserved Instances can slash your bill by up to 60% or even more compared to On-Demand pricing. That makes them an essential tool for managing the cost of any steady-state production database.
This strategy is a game-changer for small and midsize businesses trying to wrangle their AWS budgets. For example, the AWS Free Tier gives you 750 hours a month on certain database engines for up to 12 months, but costs can jump dramatically after that. By combining a Reserved Instance with a cost-effective engine like Aurora in a major region like US East, you can bring that monthly cost down to under $130. You can find more practical strategies and insights at CloudChipr.
Understanding RI Payment Options
To make RIs more accessible, AWS offers three different ways to pay. This lets you balance how much you invest upfront with your monthly operational costs. Each one offers a different discount level.
Here’s how they stack up:
- All Upfront (AURI): You pay for the entire one or three-year term in a single, large payment. This option delivers the absolute highest discount but obviously requires the most cash upfront.
- Partial Upfront (PURI): You pay a chunk of the cost upfront and then pay the rest in smaller monthly installments. It’s a nice middle ground, offering a lower initial cost than an AURI while still providing a better discount than paying nothing upfront.
- No Upfront (NURI): You commit to the term without paying anything upfront. You simply pay a discounted hourly rate each month. This is a fantastic choice for businesses that want to preserve cash flow but still lock in some solid savings.
Deciding on the right RI payment plan really comes down to your company's financial strategy. An All Upfront RI might be perfect for a business with capital ready to invest, while a No Upfront RI is often a better fit for a startup carefully managing its monthly burn rate.
The Real Cost of Amazon RDS Isn't the Instance
When you look at your Amazon RDS bill, the instance price is just the tip of the iceberg. The real story, and where budgets get blown, is in the "hidden" costs that sneak up on you based on how you actually use the database.
It's easy to focus only on the hourly rate for a server, thinking a small instance means a small bill. But a database with heavy read/write activity can rack up huge I/O and data transfer fees, even if the instance itself has modest specs. This is where a cheap RDS setup can suddenly become very expensive.
The True Price of Provisioned IOPS
For things like busy e-commerce sites or transactional systems that need rock-solid performance, Provisioned IOPS (PIOPS) storage is the go-to choice. Unlike standard storage, PIOPS lets you dial in the exact number of I/O operations per second (IOPS) you need.
But that guaranteed performance has a specific price tag. You’re billed for two things: the amount of storage you use (per GB-month) and the number of IOPS you reserve (per IOPS-month). Forgetting to factor in that second charge is a classic mistake that leads to some serious bill shock.
Imagine a database that doesn't need much storage space but gets hammered with requests. In that case, the cost of the provisioned IOPS can easily be more than the storage itself. It's a powerful tool, but you have to be careful not to pay for performance you aren't actually using.
The Sneaky Costs of Moving Data
Data transfer is probably the most misunderstood part of RDS pricing. Getting data into your RDS instance from the internet is usually free. But getting data out is a different story, and the costs can swing wildly depending on where it’s going.
A small architectural choice, like putting your app server in a different Availability Zone (AZ) from your database, can create a constant flow of data transfer fees that add up fast.
Here’s how it usually breaks down:
- Within the Same AZ: Moving data between your EC2 instances and your RDS database is free if they live in the same Availability Zone. This is the ideal setup.
- Across Different AZs: If your app is in one AZ and your database is in another for high availability, you pay for data transfer in both directions.
- Out to the Internet: This is the most expensive way to move data. It applies anytime your RDS instance sends data to users or services outside of AWS.
The financial hit from these decisions can be huge. In fact, around 70% of small to midsize businesses get surprised by their cloud bills, and these "hidden" fees are a big reason why. For example, moving 100 GB of data each month between an EC2 instance and an RDS database in different AZs only adds about $1 ($0.01 per GB). But sending 500 GB from your database out to the public internet? That could tack on an extra $44.91 to your bill. You can dig deeper into these charges by checking out this in-depth RDS pricing analysis.
Actionable Strategies to Optimize Your Amazon RDS Cost

Knowing what drives your Amazon RDS cost is half the battle. Now, let’s talk about what you can actually do about it. This is your playbook for turning understanding into action and making sure every dollar you spend on RDS is working for you.
These aren't just high-level theories; they are practical, ground-level tactics you can start using today. We’ll cover everything from matching instances to your real-world demand, picking the right storage, and a simple trick for non-production environments that can unlock massive savings.
Rightsize Your Instances with Data, Not Guesswork
One of the quickest wins in cutting your Amazon RDS cost is rightsizing. It’s the process of making sure your instance's horsepower (CPU, memory, network) actually matches what your database needs to perform. It's incredibly common for teams to overprovision instances "just in case," which is like paying for an 8-lane highway when you only have enough traffic for a two-lane road.
Instead of guessing, let the data guide you. AWS gives you the tools to see exactly how your database is performing, which often points to a cheaper instance that will work just as well.
The goal of rightsizing is simple: pay only for the resources you truly need. By analyzing utilization metrics, you can often downsize instances without any negative impact on application performance, leading to immediate savings.
For a wider look at controlling cloud expenses across the board, it's worth exploring broader strategies for optimizing cloud computing resources.
Use AWS Compute Optimizer for Smart Recommendations
AWS Compute Optimizer is a fantastic free tool for this job. It digs into your metrics from Amazon CloudWatch, like CPU utilization, database connections, and I/O patterns, to figure out if your instances are overprovisioned, underprovisioned, or just right.
From there, it gives you specific, actionable recommendations. It might tell you to switch from a memory-optimized instance to a general-purpose one if your workload isn’t actually using all that RAM. Or it could suggest a smaller instance size if your CPU usage has been consistently low.
The tool is also great at spotting opportunities to move to newer, more cost-effective instance generations. For example, it can identify where you could switch to instances powered by AWS Graviton processors, which often deliver a much better price-to-performance ratio.
Imagine Compute Optimizer finds an RDS for PostgreSQL instance running on an m5.large but only using 15% of its CPU. It could recommend moving to a smaller and cheaper t4g.medium instance and will even show you the projected monthly savings right in the console.
Choose Your Storage Type Wisely
Your choice of storage has a direct and significant impact on both performance and your monthly bill. RDS gives you a few different options, and picking the right one means you won't be paying for extreme performance you don't actually need.
The two main types you'll encounter are:
- General Purpose SSD (gp2/gp3): This is the go-to for most workloads. It strikes a great balance between cost and performance, making it a solid choice for everything from dev databases to production systems with moderate traffic.
- Provisioned IOPS SSD (io1/io2): This is the high-octane fuel for your most demanding, I/O-heavy workloads, like busy transactional databases. You pay a premium for guaranteed I/O operations per second (IOPS), so you should only use it when consistent, high-throughput performance is non-negotiable.
One of the most effective optimizations today is moving from the older gp2 storage to gp3. With gp2, performance is tied directly to storage size, which often forces you to buy more storage than you need just to get better IOPS. In contrast, gp3 lets you provision and pay for storage capacity and performance independently. This flexibility is almost always more cost-effective.
For more insights on this and other savings tactics, you can dig into our guide on broader AWS cost optimization.
Automate Shutdowns for Non-Production Environments
Let’s be honest: do your development, staging, and QA databases really need to be running 24/7? Probably not. A huge amount of cloud waste comes from leaving non-production environments running at night, on weekends, and over holidays when no one is using them.
Automating the shutdown of these idle instances is one of the fastest ways to see a dramatic drop in your bill. By simply turning off an RDS instance for 12 hours overnight and all weekend, you can slash its weekly runtime from 168 hours down to just 40. That's a cost reduction of over 75% for that single instance.
Tools like CLOUD TOGGLE are built for exactly this. They let you create simple on/off schedules for your RDS instances, turning that idle time into real savings without burdening your DevOps team with complex scripts or manual work. It's a foundational strategy for smart cloud financial management.
Here is a quick checklist to help you get started on your RDS cost optimization journey.
RDS Cost Optimization Checklist
| Strategy | Best For | Potential Savings |
|---|---|---|
| Instance Rightsizing | Overprovisioned databases with low CPU/memory usage. | 15-40% |
| Migrate to gp3 Storage | Workloads on older gp2 storage, especially if overprovisioned for IOPS. |
10-20% |
| Automate Shutdowns | Development, testing, and staging environments with predictable idle times. | 50-75% |
| Use Reserved Instances | Production databases with stable, long-term workloads (1-3 year commitment). | 30-60% |
This checklist provides a clear, actionable path to reducing your RDS spend. By methodically applying these strategies, you can make a substantial impact on your AWS bill, freeing up budget for other critical projects.
How to Monitor and Analyze Your RDS Spending
You can't optimize what you can't see. Trying to manage your Amazon RDS cost without clear visibility into your spending is like flying blind. You’ll have no way to spot waste, attribute expenses, or stop budget overruns before they snowball.
The goal is to shift from just reacting to your monthly bill to proactively managing your costs. With the right tools and habits, that AWS bill can go from being a source of stress to a treasure trove of data for making smarter infrastructure choices.
Visualize Trends with AWS Cost Explorer
Your first stop should be AWS Cost Explorer. This is the native AWS tool built to help you see, understand, and manage your cloud spending over time. It lets you build custom reports that slice and dice your costs, answering the big questions about your RDS usage.
With Cost Explorer, you can filter your bill by service to isolate just your RDS expenses, or drill down by region or linked account. But the real power comes from grouping costs by tags. This is the foundation of any serious cost analysis.
The Power of Tagging Your RDS Instances
Tagging is simply the practice of adding custom labels to your AWS resources. For RDS, this means creating key-value pairs that identify who owns an instance, what project it belongs to, or what environment it serves. It’s a simple action, but it’s one of the most effective things you can do to get a handle on your Amazon RDS cost.
Think of tags like labels on moving boxes. Without them, your entire bill is just one big, anonymous expense. With them, you can instantly see which team, project, or application is responsible for every dollar spent.
Tagging and Cost Explorer unlock true visibility into your RDS spending, often revealing surprising waste. It is common to find 20-30% of costs stemming from untagged, oversized instances in multi-team setups.
Without a solid tagging strategy, it's nearly impossible to hold teams accountable or figure out which applications are driving up the bill. For any organization serious about cloud financial management, consistent tagging is non-negotiable.
For example, AWS Cost Explorer now gives you up to 38 months of historical data for free, which is perfect for spotting long-term trends. This kind of deep visibility often shows that while database volumes grow every year, an estimated 40% of SMBs will miss major optimization opportunities because they aren’t using tags properly.
Monitor Performance with Performance Insights
While Cost Explorer tells you what you're spending, Amazon RDS Performance Insights tells you why. This tool is all about diagnosing performance bottlenecks by showing you your database load in a clear, visual way. You can see exactly what queries are running, which users are active, and what's eating up your database capacity.
Performance Insights has a free tier that gives you seven days of data retention and one million API requests a month, which is usually plenty for everyday troubleshooting. But you need to watch how its costs can add up.
If you extend data retention beyond the free seven days, you’re billed per vCPU-hour. This is incredibly useful for analyzing performance over a longer period, but it can easily become an unexpected line item on your bill if you're not paying attention. For businesses that need even more granular financial reporting, our guide on AWS Cost and Usage Reports is a great next step.
Beyond just understanding your RDS bill, using robust tools for effective cost tracking gives you a much richer view of spending patterns across all your cloud services. Ultimately, combining financial monitoring with performance monitoring gives you the complete picture you need to keep your Amazon RDS costs under control.
Frequently Asked Questions About Amazon RDS Cost
Digging into your Amazon RDS cost can feel overwhelming, and it always brings up plenty of questions. We've gathered some of the most common ones we hear from teams trying to get a handle on their database spending and provided clear, straightforward answers.
Is It Cheaper to Run a Database on EC2 Than on RDS?
This is the classic "it depends" question, but the answer usually comes down to total cost, not just the sticker price. Running a database on an EC2 instance looks cheaper on paper because you're just paying for raw compute and storage. But that's only half the story.
When you go the EC2 route, your team is on the hook for everything:
- Initial setup and painstaking configuration of the database.
- Applying security patches and keeping everything up-to-date.
- Managing backups and proving your disaster recovery plan actually works.
- Building out high availability and failover mechanisms from scratch.
Amazon RDS is a managed service. Yes, the hourly rate is higher, but that price includes AWS handling all of the operational headaches listed above. This frees up your engineers to build features that matter to your business, not babysit infrastructure. For most teams, the total cost of ownership is far lower with RDS once you account for your own team's valuable time.
Is Amazon Aurora Always More Expensive Than Standard RDS?
Not necessarily. While an Amazon Aurora instance often has a higher price tag than a comparable RDS for MySQL or PostgreSQL instance, its unique architecture can actually save you money in other ways.
For example, Aurora's storage is much more dynamic. It scales up and down automatically, and you only pay for the gigabytes you actually use. This is often more efficient than pre-provisioning a large, fixed storage volume with standard RDS that you might not fully need.
On top of that, for applications with heavy I/O, Aurora's I/O-Optimized option can be a game-changer. It bundles the I/O costs into a predictable price, which can be much more cost-effective than paying per I/O request on a standard RDS instance. The right choice really depends on your specific workload.
How Can I Start with the RDS Free Tier?
The AWS Free Tier is a fantastic way to experiment with RDS without spending a dime. For the first 12 months, you get 750 hours per month of a db.t3.micro or db.t2.micro instance (the specific instance type depends on the region). This applies to single-AZ deployments of MySQL, MariaDB, or PostgreSQL.
The Free Tier also includes 20 GB of General Purpose (SSD) storage and an additional 20 GB of storage for your automated backups. It’s perfect for learning the ropes, building a prototype, or running a very small hobby project. Just be sure to keep an eye on your usage. Anything you use beyond the free limits gets billed at the standard rates.
What Is the First Thing to Do After an Unexpectedly High Bill?
If you get a bill that makes your eyes water, the first place to go is AWS Cost Explorer. Immediately filter by service to isolate your RDS costs. From there, your best move is to group the costs by "Usage Type" and "Tag" to pinpoint exactly which database or activity caused the spike.
The culprit is often something hiding in plain sight: unexpected data transfer fees, Provisioned IOPS you forgot about, or a test instance that was left running over the weekend.
Don't forget that even your monitoring tools can add to the bill. Performance Insights is a great service that's free to start, but extended data retention isn't. The first 7 days of data are free, but keeping it longer costs about $0.015 per vCPU-hour. For instance, just two instances with dashboards refreshing every 5 seconds can be enough to push you past the free tier and add to your bill. You can find all the details in the official Performance Insights pricing structure.
Are idle, non-production RDS instances inflating your AWS bill? CLOUD TOGGLE helps you automate instance scheduling, cutting costs by over 70% on dev, staging, and QA environments. Start your 30-day free trial and see how much you can save at https://cloudtoggle.com.