Azure Savings Plans are a refreshingly simple way to cut your cloud bill. You commit to a fixed hourly spend on compute services for either one or three years, and in return, Microsoft gives you a hefty discount compared to the usual pay-as-you-go rates. It's a cost-saving model built for the real world, where workloads are dynamic and needs change.
This approach gives you a predictable way to manage your cloud budget while still being able to adapt your infrastructure on the fly.
What Are Azure Savings Plans?

Think of an Azure Savings Plan like a subscription for compute power. Instead of getting a surprise bill based on whatever you used last month, you agree to pay a steady, predictable amount, say, $10 per hour, for a set term. For making that commitment, Azure slashes the price on everything you use up to that hourly limit.
At its core, that’s the deal. You're not buying a specific virtual machine or locking yourself into one configuration. You're simply buying a discounted rate on your compute usage, making it a powerful way to bring down your Azure costs.
The Hourly Commitment Explained
The whole model pivots on one key idea: the hourly commitment. This is the flat dollar amount you promise to spend every single hour for the life of your one or three-year plan. If you commit to $5 per hour, Azure is going to bill you $5 for every hour of your term, no matter what.
Here’s how that plays out in the real world:
- Usage Below Your Commitment: Let's say your compute usage in one hour only adds up to $4. You still pay your full $5 commitment. That extra $1 doesn't roll over to the next hour.
- Usage Above Your Commitment: What if you have a spike and use $7 of compute in an hour? The first $5 is covered by your discounted Savings Plan rate. The extra $2 just gets billed at the normal pay-as-you-go price.
The trick is to set a commitment that matches your consistent, baseline compute usage. This way, you’re always cashing in on those discounted rates, minimizing waste and maximizing your savings.
Flexibility Across Services and Regions
Here’s where Savings Plans really shine. One of the biggest advantages is their incredible flexibility. Older discount models often trapped you into specific VM types or regions, but a Savings Plan applies its discount much more broadly. Your hourly commitment automatically covers eligible compute use across a ton of different services and configurations.
This means you can finally:
- Change VM Families: Go ahead and upgrade from a D-series to an E-series VM. Your discount follows you without any fuss.
- Move Between Regions: Need to shift a workload from East US to West Europe? No problem. The Savings Plan just keeps working.
- Adopt New Services: The plan covers a range of popular services, including Azure Virtual Machines, Azure App Service, Azure Functions Premium plans, and Azure Container Instances.
This kind of flexibility is a game-changer for modern businesses where infrastructure needs are always in flux. It allows you to modernize your apps and chase better performance without worrying about losing your discounts. Azure Savings Plans offer a unique way to significantly reduce costs across a wide range of Azure compute services, providing a flexible and effective alternative within the broader realm of cloud computing. This adaptability makes them a must-have for any solid cloud financial management strategy.
Azure Savings Plans vs Reserved Instances
When you're trying to get a handle on Azure costs, you'll quickly run into two main ways to get a discount: Azure Savings Plans and the classic Azure Reserved Instances (RIs). Both slash your pay-as-you-go rates, but they’re built for different kinds of needs. The big question to ask yourself is: just how predictable is my cloud setup?
Reserved Instances have been around for a while. They're perfect for businesses with rock-solid, predictable workloads. You commit to a specific virtual machine (VM) family in a specific Azure region for one or three years. That level of detail is its greatest strength and its biggest weakness; you get a great discount, but you’re locked in.
Azure Savings Plans are the newer, more flexible kid on the block. Instead of committing to a specific VM, you commit to a fixed hourly spend (like $10/hour). This discount then automatically applies to a wide range of compute services. It’s a game-changer for dynamic environments where your infrastructure is always evolving.
Flexibility and Scope: The Deciding Factors
The biggest difference between them comes down to flexibility. A Reserved Instance is like leasing a specific car model for three years. You get a fantastic rate, but you’re stuck with that exact car. If your family grows and you suddenly need an SUV instead of that compact sedan, you've got a problem.
An Azure Savings Plan, on the other hand, is like getting a pre-paid gas card for an entire rental car agency. You commit to spending a certain amount on fuel each hour, but you’re free to swap between a compact, a truck, or a van whenever you want. The discount applies no matter which vehicle you’re driving. This freedom lets you modernize your VMs, shift resources between regions, or try different instance sizes without forfeiting your discount.
The scope is what really sets them apart:
- Reserved Instances: The scope is narrow. You're tied to a specific VM family and region.
- Azure Savings Plans: The scope is broad. Your discount applies across many eligible compute services, regions, and VM families, all based on your hourly spend commitment.
To get a better feel for how the older model works, check out our detailed guide on Azure Reserved Instances. Knowing both options inside and out is the key to building a smart cost-management plan.
To make this crystal clear, let's break down the core differences in a simple table.
Azure Savings Plans vs Reserved Instances Key Differences
This table gives you a quick side-by-side look at how these two discount models stack up against each other.
| Feature | Azure Savings Plans | Azure Reserved Instances (RIs) |
|---|---|---|
| Commitment Type | Financial (hourly spend commitment, e.g., $10/hour) | Technical (specific VM family, region, and term) |
| Flexibility | High. Automatically applies to eligible compute usage across regions and VMs. | Low. Locked into the specific VM instance and region you chose. |
| Best For | Dynamic, evolving, or unpredictable workloads. | Stable, predictable, steady-state workloads that won't change. |
| Scope | Broad. Covers various compute services globally. | Narrow. Tied to a specific VM series in a single Azure region. |
| Management | Simple. "Set it and forget it" as discounts apply automatically. | More complex. Requires careful planning and management to avoid underutilization. |
| Trade-offs | Slightly lower potential discount for maximum flexibility. | Potentially higher discount but with the risk of wasted spend if needs change. |
As you can see, the choice really boils down to trading a bit of discount for a whole lot of flexibility. For most modern businesses, the agility of a Savings Plan is well worth it.
When to Choose Which Model
Here’s the thing: it’s not always an either/or decision. Many savvy organizations use a hybrid approach, mixing and matching to get the best of both worlds. The trick is to match the commitment model to the workload.
Reserved Instances still shine when you have mission-critical, steady-state workloads that you know won't change for the next one to three years. Think of a legacy application server that runs 24/7 on the exact same VM type. For these predictable workhorses, RIs might just offer a slightly deeper discount.
For pretty much everything else, Azure Savings Plans are the clear winner. This is especially true for businesses that are growing, modernizing, or have spiky compute needs. If your dev teams are constantly spinning up different VM sizes or you’re planning to migrate services across regions, a Savings Plan gives you the agility you need without any financial penalty.
A Look at the Financial Impact
The savings from either model can be huge. A Forrester Total Economic Impact study found that companies using Azure Savings Plans for compute cut their spending by an average of 48% on eligible services. When they combined this with other discounts like Azure Reservations, they achieved direct cloud cost savings of 20% by their third year. You can dig into the Forrester study on Azure cost efficiency for more details. The data is clear: a well-planned commitment strategy delivers serious financial results.
Ultimately, it comes down to your organization's comfort level with commitment. RIs lock you into technical specs, while Savings Plans lock you into a financial spend. For most modern, agile teams, the incredible flexibility offered by Azure Savings Plans makes them the more strategic and future-proof choice for optimizing cloud costs.
Let's Run the Numbers: A Real-World Savings Example
Abstract ideas like "discounts" and "hourly commitments" only really click when you put some real numbers behind them. To show you exactly what an Azure Savings Plan can do for your budget, we'll walk through a simple, step-by-step calculation for a common business scenario.
This will clear up the financial impact and give you a framework for thinking about your own cloud spending.
Let's imagine a company with a very steady, predictable compute workload. After looking at their usage history, they've found their baseline consumption is a consistent $10 per hour at the standard pay-as-you-go rates. This is their "always-on" cost for running their core applications.
Setting the Scene: The Pay-As-You-Go Baseline
Without any discounts or plans, the math is straightforward. The company's daily cost for this baseline usage is $10/hour multiplied by 24 hours, which comes out to $240 per day.
Over a full year, that adds up to a hefty $87,600 ($240/day x 356 days). This figure is the absolute maximum they would pay, and it’s the perfect starting point for our savings calculation.
Introducing the Azure Savings Plan
The company’s FinOps team decides they can comfortably commit to a portion of this baseline spend to get those sweet, sweet discounts.
They opt for a one-year Azure Savings Plan and commit to $8 per hour, which covers 80% of their consistent $10/hour usage. This is a smart, conservative move that guarantees they'll get the most out of their commitment. Let's say this one-year term gives them a 30% discount on the compute services covered by the plan.
Making this decision is where you need to match the cost model to your workload's behavior. This simple decision tree can help guide you.
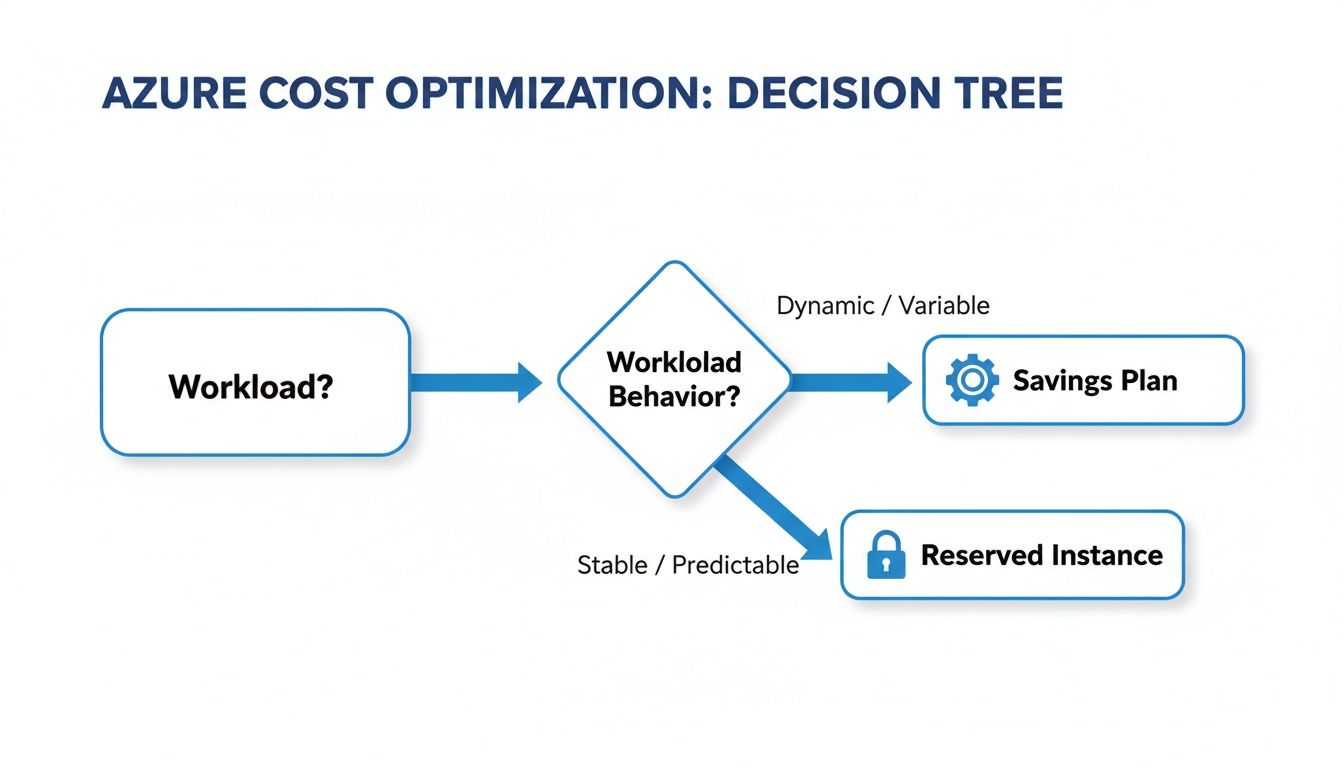
As the visual shows, workloads that are dynamic and change often are a great fit for the flexibility of a Savings Plan. While our example company's workload is stable, they still want the freedom to change VM types down the road, making a Savings Plan the perfect choice for them.
Breaking Down the Hourly Cost Calculation
With the Savings Plan in place, the hourly cost calculation changes completely.
- The Committed Portion: The first $8 of usage is now covered by the Savings Plan. With a 30% discount, the company only pays $5.60 for this portion ($8.00 x 0.70).
- The Overage Portion: The remaining $2 of hourly usage isn't covered by the commitment, so it's billed at the normal pay-as-you-go rate.
- New Total Hourly Cost: The new total is $5.60 (committed) + $2.00 (overage), which equals $7.60 per hour.
Just like that, their hourly compute cost dropped from $10.00 to $7.60. That's a reduction of $2.40 every single hour.
By committing to just 80% of their baseline usage, the company instantly achieved an overall effective savings rate of 24% on their entire baseline workload.
The Annual Impact: A Clear Business Case
When you see what that hourly saving does over a full year, the real power of this strategy becomes clear. The new annual cost is $7.60/hour x 24 hours/day x 365 days, which totals $66,576.
Let's put that side-by-side with the original cost:
| Cost Metric | Pay-As-You-Go (No Plan) | With Azure Savings Plan | Annual Savings |
|---|---|---|---|
| Hourly Cost | $10.00 | $7.60 | $2.40 |
| Daily Cost | $240.00 | $182.40 | $57.60 |
| Annual Cost | $87,600 | $66,576 | $21,024 |
By implementing one simple Azure Savings Plan, the company is on track to save $21,024 a year on this workload alone. This is exactly why cost optimization is so critical in the cloud. Considering Azure holds 24 percent of the global cloud market and is used by 95 percent of Fortune 500 companies, even small percentage gains can translate into millions of dollars in savings for an enterprise. You can read more about Azure's market position and adoption on Turbo360.com.
This example shows how you can turn abstract discounts into a solid business case. You can use this same approach by analyzing your own Azure cost data. For more detailed modeling, you might find our guide on the Azure Virtual Machine pricing calculator helpful for working through different scenarios.
Getting Your Savings Plan Up and Running
Alright, now that you understand what an Azure Savings Plan is, let's walk through how to actually buy and manage one. The process inside the Azure portal is pretty painless, but you absolutely need to do your homework first. Jumping in without a plan is a surefire way to miss out on savings or, worse, commit to spending you can't use.
First things first, you need the right permissions. To pull the trigger on a Savings Plan, you'll need to have an "owner" or "savings plan purchaser" role on either your Enterprise Agreement or the specific subscription you're working with. Once that's sorted, it's time to figure out the most important number: your hourly commitment.
How to Figure Out Your Commitment
Committing to a random hourly spend is like guessing your electricity bill; you're probably going to be wrong. The only way to make a smart decision is to use your own data. This is where Azure Cost Management and Billing becomes your best friend.
Dive into your historical compute usage to find a consistent, stable baseline of hourly spending. You're looking for the "always on" part of your cloud bill, the rock-solid minimum you're spending every single hour, day in and day out. This is the amount you can commit to without breaking a sweat.
A good rule of thumb is to commit to 70-80% of your lowest hourly compute spend from the last 30 to 60 days. This conservative approach practically guarantees you'll use 100% of your commitment while still giving you some wiggle room for any dips in usage.
Walking Through the Purchase in the Azure Portal
Once you've got your hourly commitment number, the actual purchase is a piece of cake.
Here’s the quick play-by-play:
- Find Savings Plans: Just search for "Savings plans" in the Azure portal and select it.
- Start a New Plan: Click the "Add" button to get the ball rolling.
- Configure the Details: Now you'll set the key parameters, like the commitment term, scope, and how you want to be billed.
This is where you lock in the decisions you made during your analysis.
Choosing the Right Term and Scope
Two choices here will define how your plan works and how much you save: the term length and its scope.
- Term Length: You've got two options: one-year or three-year. A three-year term will give you a much bigger discount, but it's a serious long-term commitment. If you're new to Savings Plans or expect your architecture to change a lot in the next year or two, starting with a one-year term is a smart move.
- Scope: This determines which resources get the discount. You can scope it to a single subscription, a management group, or, most flexibly, share it across your entire billing account. For most companies, a shared scope is the way to go because it automatically applies savings to eligible resources wherever they pop up.
Don't underestimate the impact of these choices. Cloud spending is a massive line item for many businesses. For instance, around 37 percent of Azure customers spend between $50,000 and $500,000 a month, and another 16 percent spend up to $5 million monthly. With budgets like that, even a small percentage saved from a well-configured plan turns into a huge win. You can dig into more of these numbers in CRN's report on cloud spending trends.
Don't "Set It and Forget It"
A Savings Plan isn't a crockpot. You can't just set it and walk away. To really get the most value, you need to check in on it regularly. The goal is simple: keep your utilization rate as close to 100% as humanly possible.
The Azure portal has a utilization report that shows you exactly how much of your commitment you're using. If you notice your utilization is consistently low, it might mean your baseline workload has dropped. That's a sign to rethink your commitment when it's time for renewal. On the flip side, if you're still racking up a lot of on-demand charges, you can probably increase your commitment and save even more. Keep an eye on the data, and you'll keep your costs optimized.
Amplifying Savings With Runtime Scheduling

Putting an Azure Savings Plan in place is a massive win for managing your cloud costs. You’ve successfully traded volatile pay-as-you-go pricing for a predictable, discounted hourly rate on your compute resources. It's a foundational move in any serious FinOps strategy.
But what problem do savings plans leave untouched? They don't do anything about the cost of resources that are running when nobody is using them. Even with a deep discount, you’re still paying for every single hour a virtual machine is on, whether it's doing productive work or just sitting idle.
This is where the next level of cloud optimization comes in. By pairing your discounted rates with intelligent runtime scheduling, you can wipe out that waste and seriously amplify your total savings.
The Hidden Cost of Idle Resources
Let's walk through a super common scenario. Your development team relies on a powerful VM for building and testing applications. The team works a standard eight-hour day, Monday to Friday. Outside of those core business hours, the VM is completely idle, just burning resources and racking up costs.
Now, you've wisely covered this VM with your Azure Savings Plan, locking in a 40% discount on its hourly rate. That’s a great start, but the machine still runs 24 hours a day, 7 days a week. That’s 168 hours of runtime. The problem is, it’s only being actively used for about 40 hours a week.
This means for 128 hours every single week, you're paying for an expensive, high-performance machine to do absolutely nothing. Even at your discounted rate, that's a significant and totally avoidable expense. The savings plan made the idle time cheaper, but it didn't eliminate the cost of that idle time.
Introducing Runtime Scheduling
Runtime scheduling is the simple but profound practice of automatically turning resources off when they aren't needed and turning them back on when they are. It's an incredibly effective strategy for slashing cloud waste, especially for non-production environments like development, testing, staging, and QA.
By applying an automated schedule to that dev VM, you ensure it only runs during the 40 hours a week it’s actually required. For the other 128 hours, the VM is powered down, and you aren’t paying a dime for its compute costs.
This one move eliminates the cost of idle compute entirely. Instead of paying a discounted rate for 128 hours of waste, you pay nothing at all. This is how you stack savings strategies for maximum impact.
This level of control goes beyond just getting a better price. It's about actively managing your consumption to tie your cloud spend directly to real business value.
The Synergy Between Savings Plans and Scheduling
When you combine Azure Savings Plans with runtime scheduling, the financial impact multiplies. You’re attacking cloud costs from two different angles, creating a powerful synergy that delivers results far greater than either strategy could on its own.
Let’s break down how they work together:
- Azure Savings Plan: This strategy targets your rate. It lowers the price you pay per hour for compute, giving you a discount on your "always-on" and predictable workloads.
- Runtime Scheduling: This strategy targets your runtime. It shrinks the total number of hours your non-essential resources are running, cutting out the bill for idle time.
Think of it like this: your savings plan is like getting a bulk discount at the grocery store, while runtime scheduling is like making sure no food goes to waste. You save money when you buy, and you save money by using it all efficiently.
To see just how powerful this combination is, let's look at a simple breakdown.
Savings Synergy: Savings Plans and Scheduling
The table below illustrates how a dual strategy of discounted rates and intelligent scheduling creates the biggest impact on your cloud bill.
| Strategy | Pay-As-You-Go Cost | Cost with Savings Plan (40% discount) | Cost with Savings Plan + Scheduling (Off 16 hrs/day) |
|---|---|---|---|
| Hourly Cost | $1.00 | $0.60 | $0.60 |
| Daily Runtime | 24 hours | 24 hours | 8 hours |
| Daily Cost | $24.00 | $14.40 | $4.80 |
| Weekly Cost (5 workdays) | $168.00 | $100.80 | $24.00 |
| Total Weekly Savings vs Pay-As-You-Go | – | $67.20 (40% savings) | $144.00 (85.7% savings) |
As you can see, the savings plan alone is a great step, delivering a solid 40% reduction. But once you add scheduling to the mix, you shut down the machine for 128 hours a week, pushing your total savings to a staggering 85.7%.
To further amplify your savings, you can leverage the broader principles of business process automation to optimize your cloud resource usage. Understanding the advantages of business process automation can provide a framework for identifying other areas where you can reduce manual effort and cut unnecessary costs.
A Clear Path to Maximum ROI
For teams that have already adopted Azure Savings Plans, implementing a scheduling solution is the logical and most impactful next step. You’ve already tackled the predictable part of your cloud spend; now it's time to go after the dynamic, non-production workloads that are notorious for waste.
By adding a tool that automates the shutdown and startup of these resources, you gain fine-grained control over your environment. This is especially vital for development and testing infrastructure, which often makes up a huge chunk of a company's cloud bill but rarely needs to run 24/7. This dual approach ensures you’re not just paying a lower rate for your compute, but that you’re only paying for the compute you actually use.
Frequently Asked Questions
When you start digging into the details of Azure Savings Plans, a few common questions always seem to pop up. Let's walk through the most frequent ones so you can map these concepts to your own infrastructure and move forward with confidence.
What Happens If My Usage Falls Below My Hourly Commitment?
This is a big one. If your actual usage of eligible services drops below your committed hourly spend, you are still charged for the full committed amount for that hour. Think of it like a monthly phone plan; even if you don't use all your data, you still pay the full price.
The key takeaway here is that the unused portion of your commitment for that specific hour is gone for good; it does not roll over to the next. This is precisely why doing your homework and analyzing historical usage is so critical before you commit. You want to pick a commitment level that matches your absolute baseline usage to make sure you're getting the most bang for your buck.
For workloads with big peaks and valleys, a smart move is to cover only the predictable, "always-on" portion with a Savings Plan. This approach minimizes the risk of paying for nothing while still locking in some serious discounts.
Can I Change or Cancel My Azure Savings Plan After Purchase?
Once you buy an Azure Savings Plan, you're in it for the full one or three-year term. Generally, you cannot cancel it. This is the trade-off for getting the discount: you're making a firm commitment to Microsoft.
However, they do offer a bit of wiggle room if your business needs change dramatically. You might be able to exchange your existing Savings Plan for a new one, but there's a catch: the new plan's total value must be equal to or greater than what's left on your original plan. This can be a lifesaver if your whole infrastructure strategy pivots halfway through your term.
It's crucial to check the latest exchange policies in the official Azure documentation because these terms can and do change. The bottom line? Be confident in your long-term forecast before you click "buy" to avoid getting locked into a plan that no longer fits.
How Do Savings Plans Work With Multiple Subscriptions?
One of the best features of Azure Savings Plans is how easily they apply discounts across your entire organization. You have three options for scoping a plan:
- Single Subscription: The discount is locked down and only applies to a single, specific subscription.
- Management Group: The savings are applied to any eligible resources within any subscription under a particular management group.
- Shared (Billing Account): The benefit is shared across every single subscription tied to your billing account.
When you scope a plan to a management group or the whole billing account, the savings get applied automatically on a first-come, first-served basis every hour. This shared approach is fantastic for organizations with lots of different departments or projects. It centralizes the commitment and ensures the discount goes wherever it's needed most without you having to manually move things around.
Do I Still Need Reserved Instances If I Use Savings Plans?
The answer is often yes, depending on how predictable your workloads are. While Savings Plans offer incredible flexibility, Azure Reserved Instances (RIs) can sometimes squeeze out a slightly higher discount for very specific, rock-solid workloads.
Many savvy organizations land on a hybrid approach to get the absolute best savings possible. Here’s what that looks like:
- Use Reserved Instances for your most predictable, mission-critical workhorses. Think of VMs where you know you'll need a specific instance family in a specific region for the long haul. This locks in the highest possible discount for your most stable infrastructure.
- Use Azure Savings Plans to cover the rest of your baseline compute spend. This is for everything that needs more flexibility, such as different VM types, services, or even regions.
This blended strategy truly gives you the best of both worlds. You get the deep, targeted discounts of RIs for your core systems and the agile, broad coverage of Savings Plans for everything else. It’s a powerful way to optimize costs across your entire Azure environment. You can also layer in other cost-saving measures, which we cover in our guide to the Azure Hybrid Benefit.
Take your Azure Savings Plans to the next level by eliminating the cost of idle resources. With CLOUD TOGGLE, you can automatically shut down non-production VMs during off-hours, amplifying your savings and ensuring you only pay for what you use. Start your free trial at https://cloudtoggle.com and see how much you can save.