That unexpected spike in your AWS bill is a story I've heard countless times, but here’s the good news: you can absolutely get it under control. This playbook is designed to give you a sustainable framework for managing your cloud spend, moving you beyond quick fixes toward a financially sound and high-performing architecture.
We’re going to cover everything from getting a real handle on your expenses to rolling out technical changes that make a serious dent in your bill.
Your Starting Point for AWS Cost Reduction
Many teams feel trapped by rising cloud costs, but a systematic approach can deliver huge savings without compromising on performance. The journey to a lower AWS bill isn't about cutting corners; it’s about wringing every bit of value from every dollar you spend. Your architecture can be both powerful and financially efficient.
This guide is your roadmap. We’ll walk through the essential pillars of cost optimization, step-by-step:
- Getting True Visibility: You can't fix what you can't see. We’ll start by digging into where your money is really going.
- High-Impact Technical Changes: This is where the magic happens. We'll cover practical steps like rightsizing instances and shutting down "zombie" resources that quietly bleed your budget dry.
- Using the Right Pricing Models: It's time to stop overpaying. You’ll learn how to use powerful AWS tools like Savings Plans and Spot Instances for the right workloads.
- Building a Culture of Cost Governance: Finally, we’ll talk about how to make financial discipline a core part of your engineering process, creating a culture of cost awareness that sticks.
Understand the Levers You Can Pull for Savings
There are two main ways to lower your expenses: operational optimizations (the things you control) and vendor price reductions (the things AWS controls). AWS periodically announces price cuts that can give you an immediate win. For example, recent price drops for S3 Express One Zone and certain EC2 instance families meant a simple migration could cut workload costs by double-digit percentages overnight.
Beyond those freebies, your own operational changes pack the biggest punch. Simply rightsizing instances and reclaiming idle resources typically cuts cloud spend by 10-25% in the first pass.
But when you combine that with newer features like Database Savings Plans and a solid FinOps practice, you can identify up to 30-40% of optimizable spend. That’s how you make significant annual savings a repeatable process. A great first step is to track official announcements from AWS to stay on top of the latest price drops.
To help you prioritize, here’s a quick overview of the most effective strategies you can implement.
High-Impact AWS Cost Reduction Strategies at a Glance
This table breaks down the heavy hitters for slashing your AWS bill, giving you a sense of the potential savings and the effort involved with each.
| Strategy | Typical Savings Potential | Effort Level |
|---|---|---|
| Terminate Unused Resources | 10-15% | Low |
| Rightsize Instances/Services | 15-40% | Medium |
| Schedule Idle Dev/Test Servers | Up to 70% (on those specific resources) | Low |
| Use Savings Plans/Reserved Instances | 40-72% | Medium |
| Leverage Spot Instances | Up to 90% | High |
| Implement Autoscaling | 20-50% (on dynamic workloads) | Medium |
As you can see, there are opportunities for quick wins and deeper, more strategic changes. The key is to start somewhere; even small changes add up quickly and build momentum for a more cost-conscious engineering culture.
Finding and Measuring Your Biggest AWS Spenders

You can't cut your AWS bill if you don't know exactly where the money is going. Real cost control isn't about staring at the monthly total; it starts with getting a granular, resource-by-resource breakdown of your spending. This is the bedrock of any serious optimization effort.
Luckily, AWS gives you some powerful native tools to dissect your spending. The goal here is to turn that confusing monthly invoice into a strategic map, showing you exactly where to focus your efforts.
Mastering AWS Cost Explorer for Granular Insights
Think of AWS Cost Explorer as your go-to detective. It’s built to help you visualize, understand, and manage your costs over time, letting you zoom in on the services, regions, or teams that are driving your bill.
Don't just glance at the default dashboard. The real magic happens when you start applying filters to isolate specific spending areas. For example, you can group your costs by:
- Service: Instantly see if EC2, RDS, or S3 is eating up the biggest slice of your budget. This tells you where to start optimizing.
- Region: If you're running in multiple AWS regions, this filter can expose surprise costs in a region you thought was barely used.
- Usage Type: This drills down into the nitty-gritty, like data transfer fees or specific EBS volume types, revealing hidden costs that are otherwise easy to miss.
Playing with these filters systematically helps you build reports that tell a clear story about your cloud spending habits. It's an essential first step for anyone who's serious about getting their AWS bill under control.
Gaining this level of detail is non-negotiable for effective FinOps. Without it, you’re just guessing. A clear, data-driven picture of your spending patterns is the only way to build a successful and sustainable cost optimization strategy.
For an even deeper dive, the AWS Cost and Usage Reports (CUR) offer the most comprehensive data you can get. These reports can be queried with tools like Amazon Athena for incredibly detailed analysis. To learn more, check out our guide on how to get the most out of AWS Cost and Usage Reports.
Turning Data into Action with Tagging and Budgets
Once you can see your costs clearly, the next move is to organize and control them proactively. This is where a solid tagging policy and AWS Budgets come into play, turning that newfound visibility into real governance.
A disciplined tagging strategy isn't just about labeling resources; it's about building a cost allocation system. By consistently applying tags like Project, Team, or Environment, you can trace every dollar spent back to its source. That accountability is what builds a cost-conscious culture.
Here’s a simple but effective tagging policy you can adopt right away:
| Tag Key | Example Value | Purpose |
|---|---|---|
| Project | Project-Phoenix |
Groups all resources related to a specific project. |
| Team | Backend-Dev |
Assigns resource costs to the responsible team. |
| Environment | Production |
Separates costs for production, staging, and development. |
| Owner | jane.doe@email.com |
Identifies the individual responsible for the resource. |
With good tagging in place, AWS Budgets becomes your early warning system. Instead of getting a nasty surprise at the end of the month, you can set up alerts that trigger when spending is projected to go over a set threshold.
For instance, you could create a budget that sends an alert to your DevOps team's Slack channel when costs for the Environment:Development tag are forecasted to exceed $500. This lets you jump on the issue and take action before a small overspend snowballs into a major problem.
Implementing High-Impact Compute Optimizations
For most companies, compute services like EC2, Lambda, and Fargate are the single biggest line item on the AWS bill. That makes them the perfect place to start hunting for major savings. Optimizing your compute spend isn’t about guesswork; it's a methodical process of aligning your resources with what your workloads actually need.
This is your playbook for tackling that biggest expense. We'll kick things off with the basics of rightsizing, then move on to clearing out wasteful "zombie" assets, and finish up with powerful pricing models like Spot Instances that can truly slash your compute costs.
Start with Rightsizing Over-Provisioned Instances
Rightsizing is simply the art of matching instance types and sizes to your workload's real performance needs at the lowest possible price. It's incredibly common for developers to over-provision resources "just in case," which means you end up paying for horsepower you never actually use. Luckily, AWS gives you the tools to spot these opportunities.
Your best friend here is AWS Compute Optimizer. This free service analyzes your CloudWatch metrics to generate specific recommendations for EC2 instances, Auto Scaling groups, and EBS volumes. It’s not just about downsizing, either; it will also flag instances that are struggling and recommend an upgrade to fix performance bottlenecks.
Here’s how to get started:
- Turn on Compute Optimizer: If you haven’t already, just opt-in from the AWS Management Console. It’s free and starts analyzing your resources right away.
- Check the Recommendations: The dashboard neatly categorizes its findings as "Under-provisioned," "Over-provisioned," or "Optimized." Your first target should be the over-provisioned list, as that’s where the immediate savings are hiding.
- Validate Before You Act: Never just blindly accept a recommendation. Always dig into the CloudWatch metrics like
CPUUtilization,NetworkIn/Out, and memory usage (you'll need the CloudWatch agent for that) to confirm an instance is truly idle before resizing it. A dev server might look quiet on a weekend but get hammered Monday through Friday.
A classic mistake is looking only at CPU. A workload could be memory-hungry or I/O-bound, so low CPU doesn't automatically mean an instance is too big. Always look at a mix of metrics over a decent period, at least 14 to 30 days, before you make a call.
Hunt Down and Terminate Zombie Assets
Beyond just oversized instances, your AWS account is probably collecting unused resources that quietly add to your bill month after month. These "zombie" assets are things that have been provisioned but aren't attached to anything running. The two most common culprits are unattached EBS volumes and idle Elastic IPs.
You're charged for EBS volumes even when they aren’t connected to an EC2 instance. Likewise, AWS hits you with a small hourly fee for Elastic IPs that are just sitting in your account, unassociated with a running instance. These charges seem small on their own, but they can easily add up to hundreds or even thousands of dollars in a large environment.
You can use the AWS CLI to find them. For example, this command will find all "available" (unattached) EBS volumes in a given region:
aws ec2 describe-volumes --filters Name=status,Values=available --query "Volumes[*].{ID:VolumeId,Size:Size}"
Once you’ve found them and confirmed the data is backed up or no longer needed, delete them. The charges stop immediately.
Slash Costs with EC2 Spot Instances
For the right type of workload, EC2 Spot Instances are one of the most powerful cost-saving tools in the entire AWS ecosystem. Spot lets you bid on spare EC2 capacity for discounts of up to 90% compared to On-Demand pricing. The trade-off? AWS can take that capacity back with only a two-minute warning.
This makes Spot a fantastic fit for any workload that is fault-tolerant, stateless, or can gracefully handle interruptions.
Ideal use cases include:
- Big data and analytics jobs
- CI/CD pipelines and test environments
- High-performance computing (HPC)
- Batch image and video rendering
- Large web server fleets that can afford to lose a node here and there
To use Spot effectively, you have to design your applications for resilience. A common pattern is to use EC2 Auto Scaling groups with a mix of Spot and On-Demand instances. This ensures your application stays online even if some Spot instances are reclaimed. You can learn more in this deep dive into how to EC2 Spot Instances to achieve major cost savings.
When you put all these strategies together, the impact can be massive. Because compute is such a large part of the bill, targeted optimizations here deliver outsized results. In fact, one analysis showed that a company with a $5 million annual AWS bill, where compute is 60% of the spend, could realistically save between $900,000 and $1.2 million a year just by combining rightsizing, Spot adoption, and long-term commitments. To see how these numbers add up, you can explore more insights on AWS compute rate optimization.
Mastering AWS Pricing Models for Long-Term Savings
If you're running predictable workloads on AWS using only On-Demand pricing, you're leaving a lot of money on the table. Think of it like paying the full sticker price for a car when you know a huge discount is available if you just commit to the purchase. Moving away from this expensive default is one of the most impactful ways to lower your AWS bill for the long haul.
AWS offers a couple of powerful commitment-based pricing models that slash your costs in exchange for agreeing to a certain level of usage over a one or three-year term. Getting a handle on these isn't just a tech task; it's a core financial strategy for any serious cloud operation.
The two main players here are Savings Plans and Reserved Instances (RIs). While both can offer deep discounts, they have different levels of flexibility and are built for slightly different strategic goals. Picking the right one is crucial for getting the best return on your investment.
Choosing Between Savings Plans and Reserved Instances
Savings Plans are the newer, and frankly, more flexible of the two. You commit to spending a specific dollar amount on compute per hour (say, $10/hour) for a set term. In return, you get a big discount on that usage across several services, including EC2, Fargate, and Lambda.
This flexibility is their killer feature. You can change instance families, switch instance sizes, or even move to a different region, and your discount follows you. It's built for the way modern teams work.
Reserved Instances are the older model. With RIs, you're committing to a very specific instance configuration in a particular Availability Zone. They can sometimes offer slightly deeper discounts, but they are far more rigid. If your application architecture changes, you could easily get stuck paying for a reservation you can no longer use.
For most organizations I work with, Savings Plans are the recommended starting point. Their flexibility means your architecture can evolve without blowing up your cost savings, making them a much safer bet in today's dynamic cloud world.
This decision tree helps visualize where different compute optimization strategies, including these pricing models, fit into the picture for your EC2 workloads.
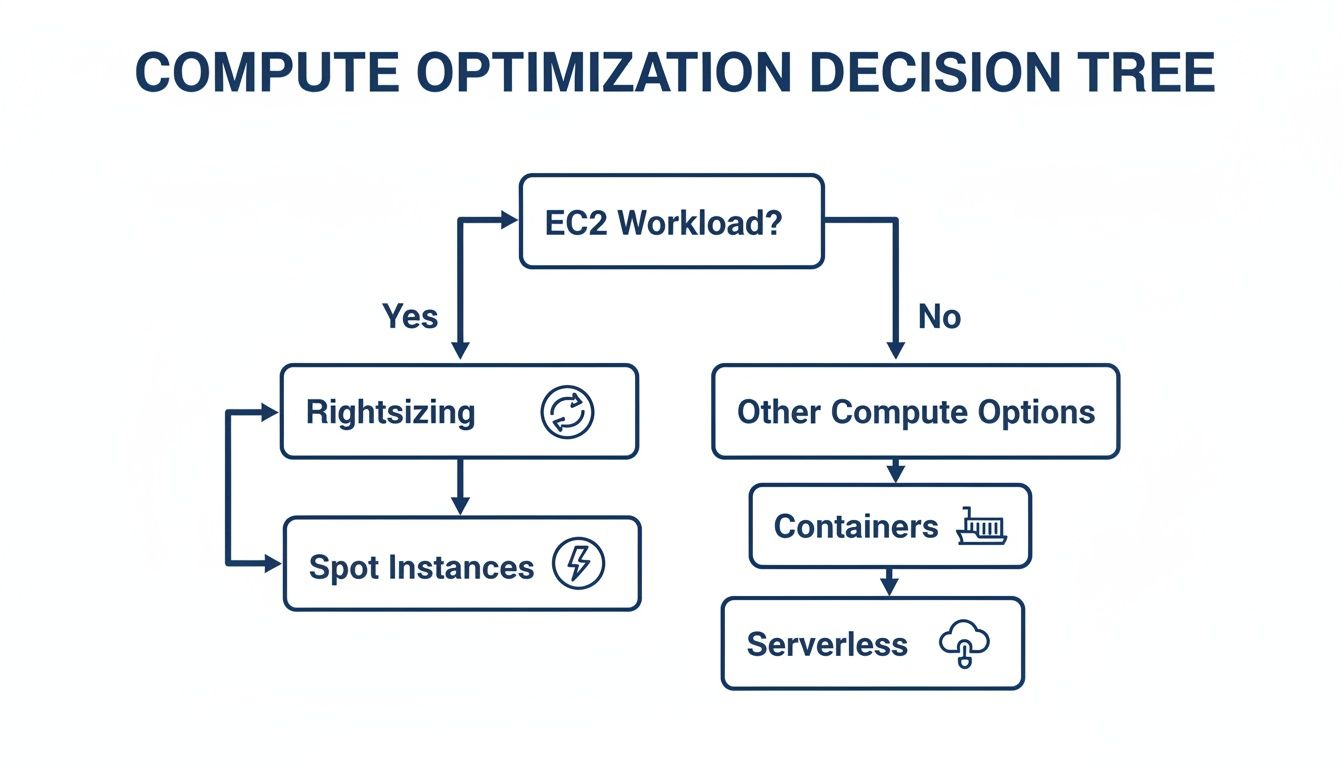
As you can see, rightsizing is always the first step. After that, for your steady-state workloads, you'll want to layer in a commitment model to lock in savings.
Here’s a quick table to help you compare the two directly.
Savings Plans vs Reserved Instances (RIs)
| Feature | Savings Plans | Reserved Instances |
|---|---|---|
| Commitment Type | Spend-based ($X per hour) | Capacity-based (specific instance type) |
| Flexibility | High: Can change instance family, size, region, OS | Low: Locked to a specific instance type and AZ |
| Services Covered | EC2, Fargate, Lambda (Compute SP) | EC2, RDS, Redshift, ElastiCache, etc. (specific to each) |
| Discount | Up to 72% | Up to 72% (can be slightly higher in some cases) |
| Best For | Dynamic, evolving workloads | Extremely stable, unchanging workloads |
Ultimately, Savings Plans offer a more modern and adaptable way to save, while RIs still have a place for workloads that are absolutely predictable for years to come.
How to Purchase a Savings Plan
Once you've analyzed your usage, buying your first Savings Plan is surprisingly straightforward. Your go-to tool for this is AWS Cost Explorer, which provides data-backed recommendations.
Here’s how it works in practice:
- Analyze Your Usage: First, head over to the AWS Cost Explorer and click on "Savings Plans" > "Recommendations." AWS will comb through your historical usage (you can choose the lookback period) and suggest a commitment level, complete with estimated monthly savings.
- Select a Plan Type: You'll need to choose between Compute Savings Plans (the most flexible option, covering EC2, Fargate, and Lambda) or EC2 Instance Savings Plans (less flexible but offers a higher discount for a specific instance family in one region).
- Choose a Term and Payment Option: Next, select either a one-year or three-year term. Three-year terms give you the best discounts, but that's a long commitment. You can also pick between "No Upfront," "Partial Upfront," or "All Upfront" payments; the more you pay upfront, the better the discount.
- Purchase and Verify: After you add the plan to your cart and check out, it becomes active instantly. Make sure to circle back and check the utilization reports to confirm it's being applied correctly across your accounts.
By layering in commitment-based discounts, organizations regularly see savings of 20–35% with one-year plans. Many successful teams use a blended strategy: Savings Plans for general-purpose flexibility, a few RIs for rock-solid legacy workloads, and Spot Instances for fault-tolerant tasks. The goal is to get your coverage above 60–80% of your predictable compute spend. For a deeper dive, you can learn more about new AWS Reserved Instance strategies and Savings Plans. This approach turns your cloud budget from a reactive expense into a predictable, optimized investment.
Automating Cost Control and Scheduling Idle Resources
Let’s be honest: trying to manage your cloud costs with manual checklists and constant human oversight is a recipe for disaster. As your infrastructure grows, it's just a matter of time before someone forgets to shut down a server. Human error is inevitable, and it leads to wasted money.
The only way to sustainably cut your AWS bill is with smart automation. It’s about building a system that eliminates waste on its own, without you having to constantly babysit it. Automation turns cost control from a reactive headache into a proactive, "set it and forget it" strategy, ensuring you’re only paying for what you actually use.
Match Capacity to Demand with Auto Scaling
One of the most powerful automation tools AWS gives you is AWS Auto Scaling. Its job is simple but critical: to perfectly match the number of EC2 instances you have running to your real-time user demand. This single feature prevents the classic, costly mistake of running a dozen servers 24/7 when you only need that kind of firepower for a few peak hours.
You just configure policies based on metrics like CPU utilization or network traffic. When demand spikes, new instances launch automatically. When things quiet down, the unneeded ones are terminated. This dynamic approach means you stop paying for idle compute power. It’s a foundational tactic for any cost-conscious engineering team.
A well-tuned Auto Scaling group is often the difference between a budget that scales predictably with traffic and one that just balloons out of control. It’s the key to achieving the true elasticity the cloud always promised.
Shut Down Non-Production Environments After Hours
Your development, staging, and testing environments are notorious budget killers. I’ve seen it a hundred times; they often sit completely idle for 12+ hours a day, plus entire weekends, all while racking up charges.
Implementing an automated shutdown schedule for these non-production resources is one of the fastest ways to find some serious savings. By simply turning them off outside of business hours, you can slash their specific costs by over 60%. It's a low-effort, high-reward move with an immediate impact on your bill.
You’ve got a few ways to get this done:
- AWS Instance Scheduler: A ready-made solution from AWS that you deploy with a CloudFormation template. It uses Lambda and DynamoDB to manage schedules based on resource tags.
- Custom Scripts: If you want total control, you can write your own Lambda functions triggered by Amazon EventBridge. This gives you maximum flexibility but requires more upkeep.
- Third-Party Tools: Platforms like CLOUD TOGGLE simplify this entire process. You get an intuitive interface to manage schedules without needing to be an AWS expert. For a deep dive, you can explore this guide on how to schedule your AWS instances to save costs and figure out the best approach for your team.
This simple bit of automation is a powerful way to shrink your AWS bill without getting in the way of your developers' productivity.
Automate Storage Tiering with S3 Lifecycle Policies
Storage costs, especially from S3, have a sneaky way of creeping up on you as data piles up. Nobody wants the job of manually moving terabytes of old logs, backups, or user uploads to cheaper storage. Luckily, you don’t have to.
This is exactly what S3 Lifecycle policies were made for. These are just simple, automated rules you set up directly on an S3 bucket. You can create policies to automatically move data to more cost-effective storage classes after a certain amount of time. For instance, you could set a rule to transition objects from S3 Standard to S3 Infrequent Access after 30 days, then archive them to S3 Glacier Deep Archive after 90 days.
This is true "set it and forget it" optimization. Once your policy is in place, it works silently in the background, continuously trimming your storage costs as your data grows.
Building a Culture of Cost-Conscious Engineering
Tools and scripts will only get you so far. If you want to really get your AWS bill under control and keep it that way, the change has to be cultural. Lasting cost control isn’t about a piece of software; it’s about embedding cost awareness directly into your engineering DNA.
This is a fundamental shift. It moves cost from some number a finance person worries about at the end of the month to a core metric, sitting right alongside performance and reliability. When you give developers the right visibility and a few sensible guardrails, they naturally start building more efficient, cost-effective architectures from the very beginning.
Implement Proactive Cost Guardrails
One of the best ways to build this culture is to make it hard to make expensive mistakes in the first place. This is where you can lean on AWS Identity and Access Management (IAM) policies and Service Control Policies (SCPs) as powerful, proactive guardrails. The goal isn’t to restrict developers, but to guide them toward smarter, more economical decisions.
For example, why should anyone be able to launch a monstrously expensive, GPU-intensive instance in a simple dev environment? A simple IAM policy can block those specific EC2 families, nudging engineers to pick something more appropriate for their testing needs. It’s a gentle, automated nudge in the right direction.
You can also use SCPs to set broader rules across your entire AWS Organization. We've seen teams have a lot of success with this by:
- Restricting AWS Regions: If you don't do business in
sa-east-1, why allow resources to be launched there? Blocking unused regions prevents accidental spend and simplifies your security posture. - Disabling Unused Services: Some AWS services are incredibly powerful but also incredibly easy to rack up a huge bill with if you're not careful. If your organization has decided not to use a particular service, you can block it entirely to remove the temptation of experimental spending that never gets cleaned up.
Think of these guardrails as an automated safety net. They make financial discipline a frictionless part of the development lifecycle.
Foster Ownership with Regular Cost Reviews
Visibility is the first step, but ownership is what actually drives change. We've found that holding regular, blameless cost review meetings is a game-changer for getting engineering teams to take direct responsibility for what they spend.
In these meetings, teams look at their specific service costs from the past month, dig into any spending spikes, and, just as importantly, celebrate the wins where they made something more efficient.
The goal here is never to point fingers. It's about creating a collaborative feedback loop. When a developer sees the cost data for their own service, they're the one person who can immediately understand why it happened and what architectural tweak could fix it.
This process flips the script on cost management. It stops being a top-down mandate from finance and becomes a bottom-up initiative driven by the engineers themselves. When they are directly involved in analyzing their spending, they become true stakeholders. That's how the drive to lower your AWS bill becomes a shared responsibility, deeply embedded in your team’s DNA.
Answering Your Top Questions About AWS Savings
When you start digging into cloud cost optimization, a lot of questions pop up. It's a common experience. Here are some straightforward answers to the questions I hear most often from teams trying to get a handle on their AWS bill.
Where’s the Best Place to Start Saving Money?
For the biggest impact with the least amount of effort, I always point people to two specific areas.
First, terminate unused resources. Think of things like unattached EBS volumes or forgotten Elastic IPs. They're just sitting there, quietly adding to your monthly bill. It’s pure waste, and cutting it is the easiest win you'll get.
Second, schedule your non-production environments. Your dev, staging, and QA servers probably don't need to run 24/7. Simply turning them off after work hours and on weekends can slash their costs by over 60%. You get a huge saving without touching a single line of production code.
How Much Can I Realistically Save?
The amount varies, but almost everyone is surprised by how much they can cut. It's not uncommon to see some pretty dramatic results with a focused effort.
- Quick Wins: Just by cleaning up idle resources, that "low-hanging fruit," most teams can trim 10-15% off their bill in the first month.
- Deeper Cuts: When you start combining strategies like rightsizing, using Savings Plans, and leveraging Spot Instances, you can often reduce your total compute spending by 40% or more.
- The Power of Scheduling: That simple act of shutting down idle servers? It consistently saves over 60% on the cost of those specific machines.
The real secret is consistency. Small, continuous improvements add up to massive annual savings and stop costs from creeping back up. A typical organization can realistically cut its AWS bill by 20-30% within the first few months of a dedicated optimization push.
Will Cost Optimization Hurt My Application Performance?
Absolutely not, if you do it right. This is a huge misconception. The goal of cost optimization isn't to starve your applications of resources; it's to eliminate waste and run efficiently.
Rightsizing, for instance, isn't just about downsizing. It’s also about finding overworked, under-provisioned instances that are creating bottlenecks and upgrading them. Likewise, autoscaling is the perfect example of this balance. It ensures you have all the power you need during peak traffic but automatically scales down to save money when things are quiet.
Ultimately, the goal is to perfectly match your infrastructure to your workload's actual demand. When you get that right, you almost always improve both cost and performance.
Ready to stop paying for idle servers? CLOUD TOGGLE makes it easy to automate shutdown schedules for your AWS and Azure resources, cutting costs without complex scripts. Start your free trial and see the savings at https://cloudtoggle.com.